

iOS 14 was released in September of 2020, and it brought in new and exciting experiences to iOS devices. With a ton of new features rolling in, the one that caught my attention was the addition of home screen widgets.
My mind immediately started running and thinking of how extending apps could solve potential problems for different types of scenarios. This is not a new feature to Android devices, but this is a first for Apple having this much customization on the home screen.
Widgets are very small sandbox apps that can interact with your main app to display and update information for your users. Tapping on the widget takes the user directly into your app. There are different size variations, and developers can provide different setups and types to allow the user to personalize the widget to their liking.
I used and interacted with widgets on a daily basis for months after the iOS 14 update. We use React Native here at Airship, and I really wanted to figure out how to leverage this new tech.
After some research, testing, failures, and building, I now have a couple different approaches that could be used to integrate widgets with React Native.
One is to send information from the React Native app to an App Group, and then pulling that data in Swift inside the widget. Another way, is keeping the React Native app totally separate from the Swift side, and use a SDK from a CMS for pulling in data.
How WidgetKit Works
Widgets are application extensions that work off of a timeline provider that will tell the widget when to make updates. There are limits to size of the widget, and how frequent it can update. It is best to think of hourly or more intervals for updates. There are two different entries that WidgetKit will look for, a snapshot or an array of entries. The snapshot is used when the widget is shown to the user as a preview, before they place it on their home screen. It is setup to be shown with static data. After the widget is placed, then it will look to the array of entries to know what to display in the widget. This is where data calls will happen, and other logic to determine what will be displayed in the widget as time progresses.
Widgets are created via the Widget protocol. The files associated with it are written in Swift, and the display for the widget is created with SwiftUI. The downside to having the widget extension attached to the React Native app, is that the SwiftUI preview in Xcode has not worked for me during development. Native apps don’t have this issue, just when running it with a React Native app. It is not a deal breaker, since you can just re-build the widget after changes are made. Widgets are small, so not a bad wait time!
Let’s Talk Code
I’ll go through one of the routes I tested, sending data from React Native to the widget. There are a couple of prerequisites for being able to successfully create a React Native app with a widget extension:
- Most up-to-date version of Xcode so it can run iOS 14 on your simulator and have access to WidgetKit.
- Apple Developer Account (you need this for signing and App Groups)
React Native => Bridge => Swift
In this guide, I will be showing the route of sending information from React Native over the bridge, to the widget. Startup a new React Native project (note: this has to be a bare React Native app, this will not work with Expo):
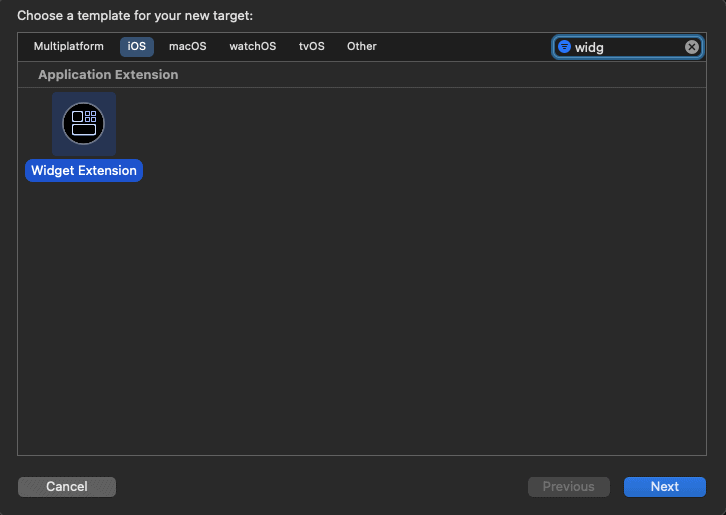
npx react-native init ReactNativeWidgetcd into your ios folder and run xed . to open up your project in Xcode. Click File => New => Target and search for and select the Widget Extension.
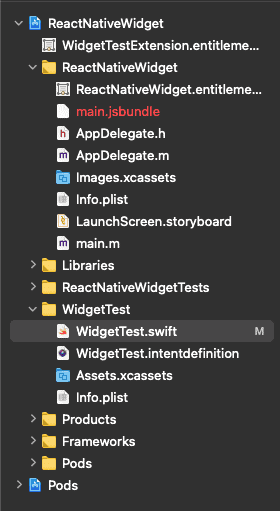
After hitting next check the Include Configuration Intent (I won’t be showing that in this post, but check out the documentation for more info). I called my widget, WidgetTest. After hitting Finish you will now see in the project the folder of the name you gave the widget.
In WidgetTest.swift you will see boilerplate code in place for the widget with different structs called SimpleEntry, Provider, etc.
First thing we need to do is setup our App Groups so data can be shared from the React Native app and the widget extension. Click the main target, ReactNativeWidget, and inside “Signing & Capabilities” tab hit the + at the top-right of the window. Also, ensure you have an active paid Apple Developer account so you can successfully create the App Group for the app and widget.
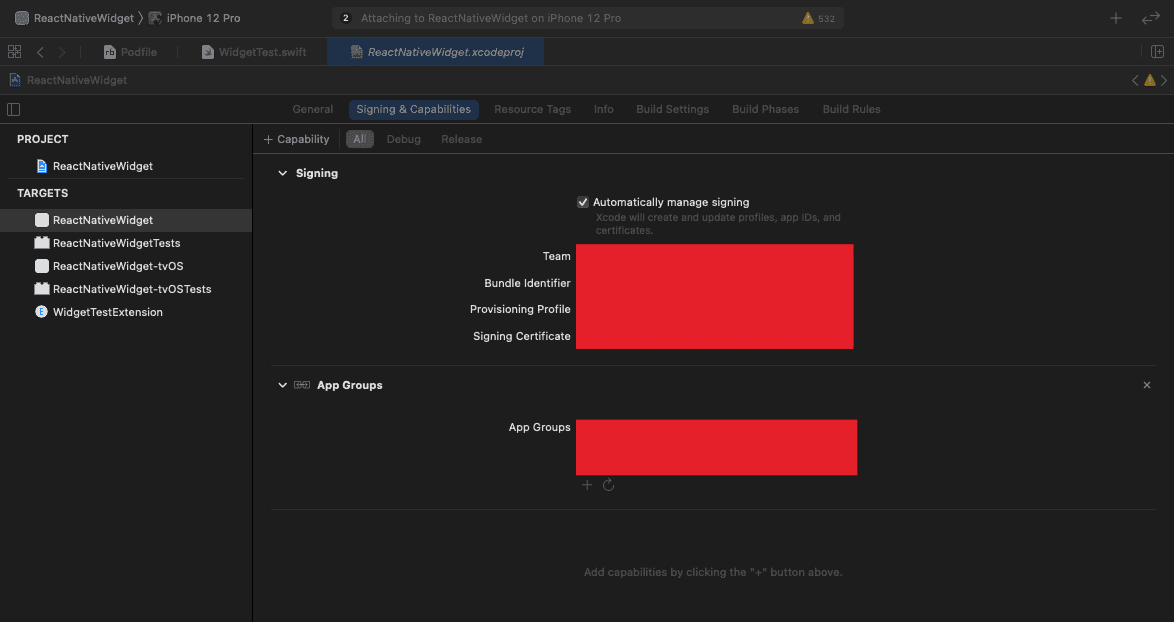
Note: Yours won’t have the App Groups section just yet, that’s what is being added now.
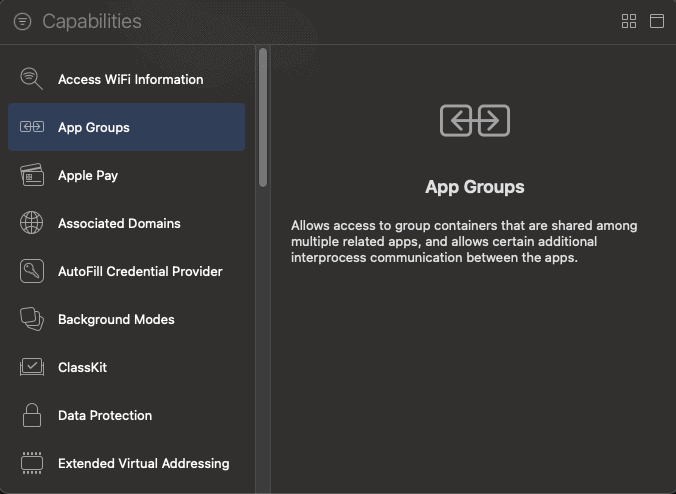
Select “App Groups”
After it is added, hit the plus right under the newly created App Groups section to add a new App Group. Then type in a name for it (ex: group.com.YOURINFO.ReactNativeWidget)
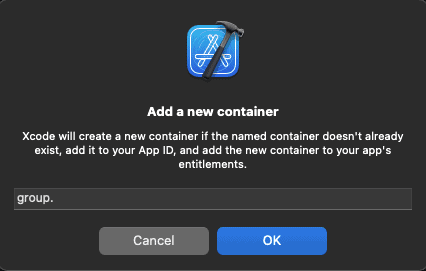
Note: You may need to hit the refresh icon under the added group name if it is red. May take one or two times.
Follow the same steps but for the WidgetTestExtension target. Make sure it uses the same named group. After you have that, open up the React Native app in your code editor of choice.
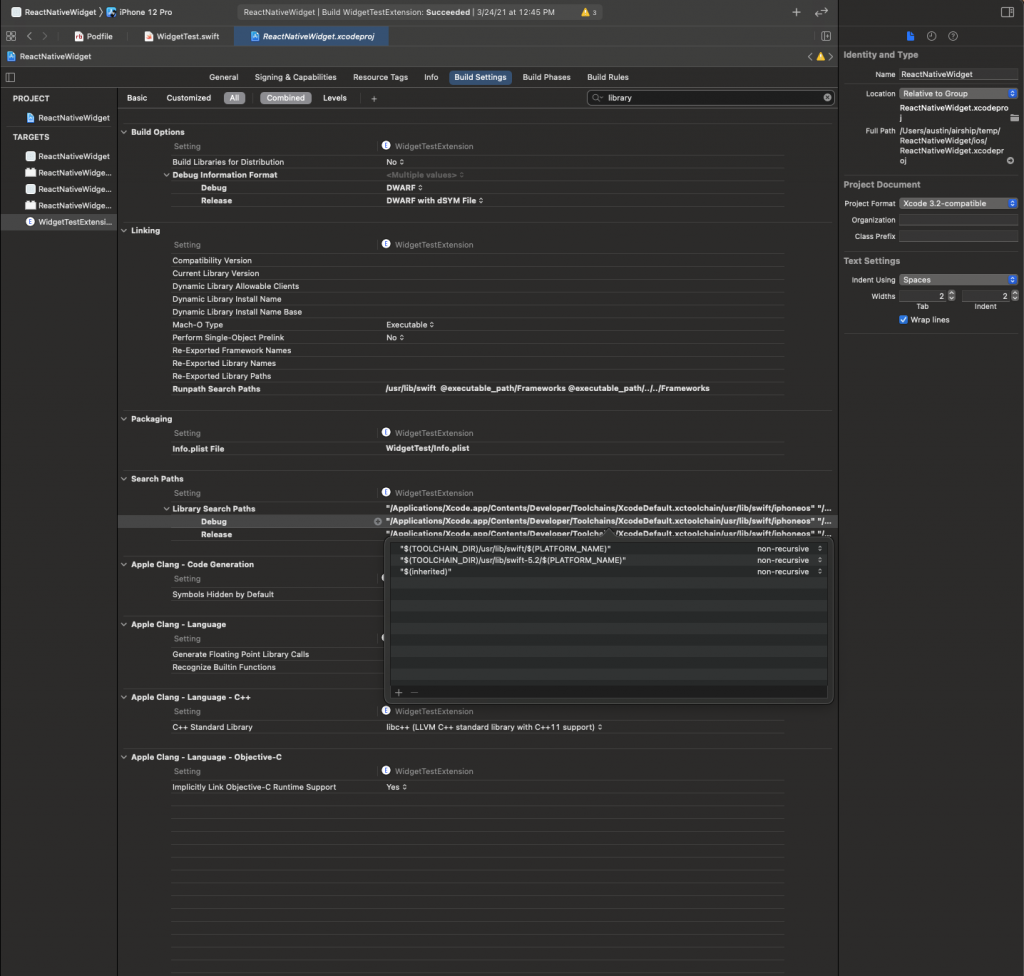
For the React Native app to build correctly, you need to upgrade the swift version on the toolchain path from 5.0 to 5.2. Do this for both debug and release. Double click to edit each line.
First thing is to add react-native-shared-group-preferences. It is a library that really is just an Objective-C bridging file to take data from the React Native app, and put it into UserDefaults for Swift to access the data in our widget. Using this library quickly gives you easy to use functions without having to create your own bridging files and native functions. The test app I created only has a View with a TextInput inside to take in user inputs to display on the widget. Simple implementation for this test, but you could put a bigger object with arrays and other data fields to be sent to the widget. Here is what my App.tsx looks like with the library put in place:
import SharedGroupPreferences from 'react-native-shared-group-preferences';

const appGroupIdentifier = 'group.com.YOURINFO.HERE';

const App = () => {
  const [inputText, setInputText] = useState('');
  const widgetData = {
    displayText: inputText,
  };

  const handleSubmit = async () => {
    try {
      await SharedGroupPreferences.setItem(
        'savedData', // this is a key to pull from later in Swift
        widgetData,
        appGroupIdentifier,
      );
    } catch (error) {
      console.log({ error });
    }
  };

  return (
    <View style={styles.container}>
      <Text>Enter text to display on widget:</Text>
      <TextInput
        style={styles.input}
        onChangeText={(text) => setInputText(text)}
        value={inputText}
        returnKeyType="send"
        onEndEditing={handleSubmit}
      />
    </View>
  )
}
Add the group name you created earlier to the appGroupIdentifier variable. The idea is to make an async call to set the item in UserDefaults via the library with a key of your choosing. In my case, I called it "savedData". So with that setup, go back into Xcode and open up WidgetTest.swift. It is time to dive into some Swift code!
The first thing to look at is the SimpleEntry struct. It is a TimelineEntry which is a data model for what is showing or controlling the widget. We will add just one string value to the struct to match what we are currently sending to the UserDefaults. We will add the string called displayText to match React Native. Your struct should look like this:
struct SimpleEntry: TimelineEntry {
  let date: Date
  let configuration: ConfigurationIntent
  let displayText: String
}
You will probably start to get some errors since the rest of the app is now missing this piece of data. On the WidgetTest_Previews add some preview text to the SimpleEntry
struct WidgetTest_Previews: PreviewProvider {
  static var previews: some View {
    WidgetTestEntryView(entry: SimpleEntry(date: Date(), configuration: ConfigurationIntent(), displayText: "Widget preview"))
      .previewContext(WidgetPreviewContext(family: .systemSmall))
  }
}
And do the same for the functions placeholder and getSnapshot in the Provider struct.
func placeholder(in context: Context) -> SimpleEntry {
    SimpleEntry(date: Date(), configuration: ConfigurationIntent(), displayText: "Placeholder")
}

func getSnapshot(for configuration: ConfigurationIntent, in context: Context, completion: @escaping (SimpleEntry) -> ()) {
    let entry = SimpleEntry(date: Date(), configuration: configuration, displayText: "Data goes here")
    completion(entry)
}
The placeholder is the initial render the first time your widget shows. Snapshot is how your widget appears in the widget gallery and needs static mock data to render quickly.
For more info, be sure to go over the documentation!
The last thing to look over for data setup is the getTimeline function. You will see it missing the displayText as well. Before attending to that, let’s make a struct for the data that will be coming into the app. I put this above the Provider, but you could put this in a separate Swift file if needed for more complex data structures.
struct WidgetData: Decodable {
   var displayText: String
}
This struct needs to have declaration type of Decodable because this represents external data we want to pull in and parse.
Now back in the getTimeline function, we need to setup a few things:
- Access
UserDefaultsso we can access data we set in React Native - Decode the data from
UserDefaultswith the matching key - Create a refresh time
- Fill in a
SimpleEntrywith the parsed data - Set the timeline
Delete everything inside the function and let’s start from the beginning. We need to define the current date as well as identify the UserDefaults our widget is accessing.
func getTimeline(for configuration: ConfigurationIntent, in context: Context, completion: @escaping (Timeline<SimpleEntry>) -> Void) {
    let entryDate = Date()
    let userDefaults = UserDefaults.init(suiteName: "group.com.YOURINFO.ReactNativeWidget")
  }
We will make an if statement to check if sharedDefaults has initialized.
if userDefaults != nil {
    // TODO Widget functions
}
Inside the if statement we need to check if a value exists in the sharedDefaults matching the key, “savedData”, that we used in the React Native app. If it does not exist, we will just plug in data into the SimpleEntry for now to keep errors from occurring.
if userDefaults != nil {
    if let savedData = userDefaults!.value(forKey: "savedData") as? String {
        // TODO
    } else {
        let nextRefresh = Calendar.current.date(byAdding: .minute, value: 5, to: entryDate)!
        let entry = SimpleEntry(date: nextRefresh, configuration: configuration, displayText: "No data set")
        let timeline = Timeline(entries: [entry], policy: .atEnd)

        completion(timeline)
    }
}
nextRefresh is the current date, but five minutes ahead. The fastest a widget can update is five minutes, so we will do that for testing’s sake. In a real world situation you may would write it as:let nextRefresh = Calendar.current.date(byAdding: .hour, value: 1, to: entryDate)!
This would refresh every hour.entry is our SimpleEntry filled out with some placeholder data, and timeline takes our entry and adds a policy of when to create a new timeline. For this example, we will use atEnd so that at the end of five minutes, it will check the savedData values again and display them.
Back inside the if let savedData statement, we need to add logic to decode the data from the UserDefaults. We need to initialize a JSONDecoder to parse the data. Also, go ahead and setup the data variable.
let decoder = JSONDecoder()
let data = savedData.data(using: .utf8)
Right under that, we will use the decoder on our data variable to parse our data and save it to a new variable called parsedData. If it is successful, we add the same variables as the else statement earlier except plugging in the display text from parsedData.displayText.
if let parsedData = try? decoder.decode(WidgetData.self, from: data!) {
    let nextRefresh = Calendar.current.date(byAdding: .minute, value: 5, to: entryDate)!
    let entry = SimpleEntry(date: nextRefresh, configuration: configuration, displayText: parsedData.displayText)
    let timeline = Timeline(entries: [entry], policy: .atEnd)

    completion(timeline)
} else {
    print("Could not parse data")
}
So our widget can now pull in the data and display it properly! Here is the full getTimeline function:
func getTimeline(for configuration: ConfigurationIntent, in context: Context, completion: @escaping (Timeline<SimpleEntry>) -> Void) {
    let entryDate = Date()

    let userDefaults = UserDefaults.init(suiteName: "group.com.YOURINFO.ReactNativeWidget")
    if userDefaults != nil {
        if let savedData = sharedDefaults!.value(forKey: "savedData") as? String {
        let decoder = JSONDecoder()
        let data = savedData.data(using: .utf8)

        if let parsedData = try? decoder.decode(WidgetData.self, from: data!) {
            let nextRefresh = Calendar.current.date(byAdding: .minute, value: 5, to: entryDate)!
            let entry = SimpleEntry(date: nextRefresh, configuration: configuration, displayText: parsedData.displayText)
            let timeline = Timeline(entries: [entry], policy: .atEnd)

            completion(timeline)
        } else {
            print("Could not parse data")
        }

        } else {
            let nextRefresh = Calendar.current.date(byAdding: .minute, value: 5, to: entryDate)!
            let entry = SimpleEntry(date: nextRefresh, configuration: configuration, displayText: "No data set")
            let timeline = Timeline(entries: [entry], policy: .atEnd)

            completion(timeline)
        }
    }
}
Before we start running this app, let’s style up the widget a little. Widget’s can only be styled with SwiftUI (which is amazing!). Go to the WidgetTestEntryView and update the body with some SwiftUI styling. I used a LinearGradient with a VStack overlay that has some padding that just displays the displayText. Nothing crazy or fancy, but definitely take a deep dive in SwiftUI to make some really cool designs as you build out your widget!
struct WidgetTestEntryView : View {
  var entry: Provider.Entry

  var body: some View {
    LinearGradient(gradient: Gradient(colors: [.red, .orange]), startPoint: .top, endPoint: .bottom)
      .edgesIgnoringSafeArea(.vertical)
      .overlay(
        VStack {
          Text(entry.displayText)
            .bold()
            .foregroundColor(.white)
        }.padding(20)
      )
  }
}
Time to Test ????
Run the app by selecting the React Native target first

After it builds and runs, you can go ahead and run the WidgetTestExtension to install the widget.

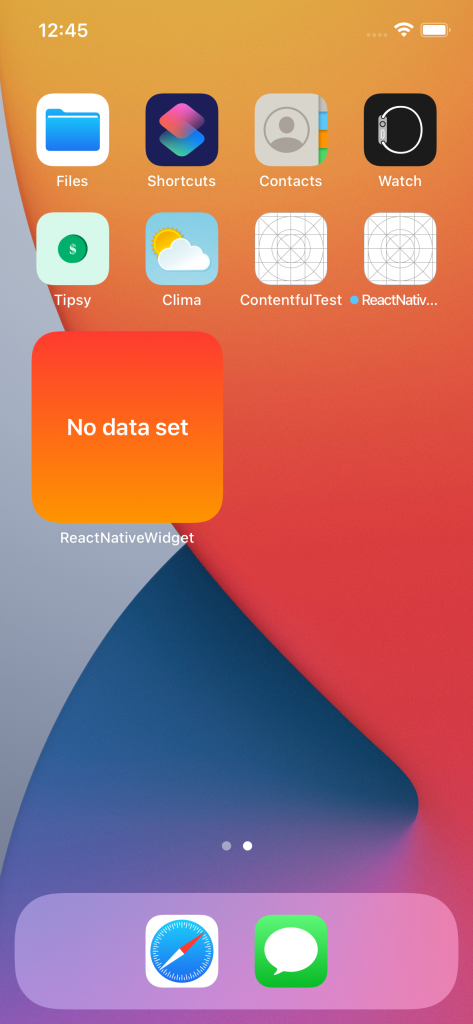
It will default to its no data state since we have not input any text on the React Native side.
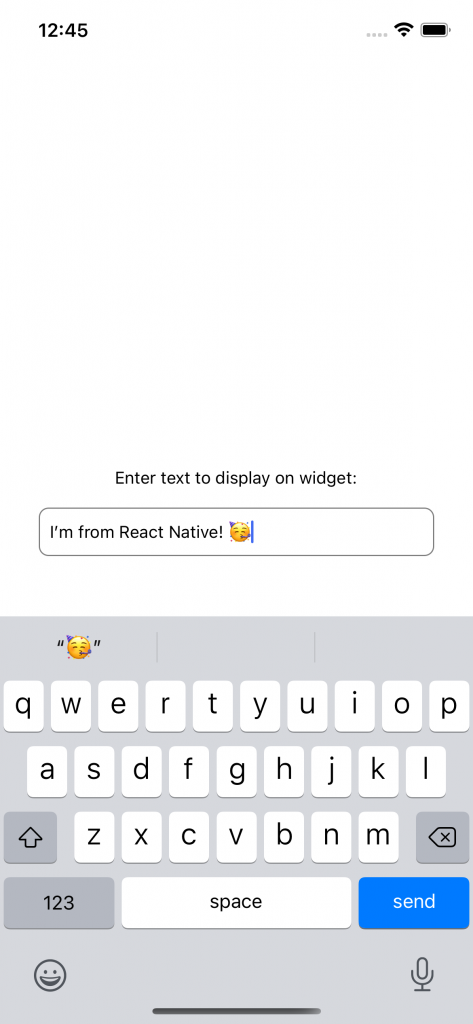
Open the app by clicking the widget or app icon. Input your data, hit send, and after the refresh time comes you will see your message displaying on your widget from React Native!!
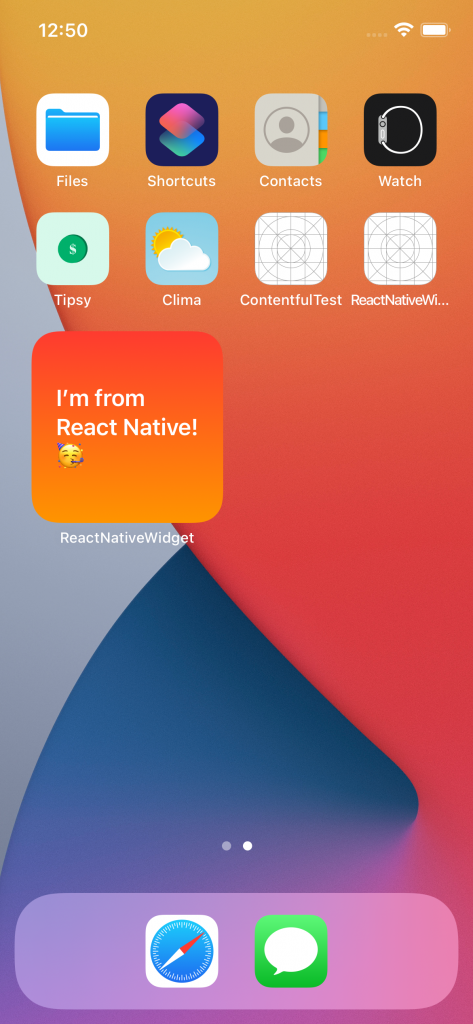
It lives!
You now have a widget running off of a React Native application that can send info to update after a set time. This starting point should allow you to push and test what you can do. I was able to archive and sign the app with an adHoc profile which allowed me to install it on my own phone to play around with. Being able to run it without Xcode on my physical device, proved that this could potentially be used in production with enough testing.
One thing I noticed is when adding the widget to your phone, you need to have run the app at least once for the widget to show up in the widget gallery on your home screen. I am unsure if this is typical behavior and it isn’t a huge deal, but something to keep in mind.
It was so fun diving into the world of Swift and adding a native feature to React Native. Trying to tinker and test out different native things with React Native is exciting, and it is really interesting to see what is possible with this framework.


