

Our client recently made a significant step for a more secure authentication flow by moving from basic authentication to OAuth 2.0, using Auth0 as their authentication service (check out Auth0’s overview of OAuth 2.0). With basic authentication, our app was managing a login screen with form fields for usernames and passwords, but with Auth0, our app never touches the users’ passwords. It simply offloads the log-in process to Auth0 and checks in with Auth0 to see if the user is authenticated.
Differences Between Web and Electron Implementations
One of the big differences between implementing Auth0 on the web and in an Electron app is that the authentication flow on the web relies on a set of redirects. On a web app, when authentication succeeds, Auth0 can simply redirect the user back to that web app’s URL, and the user can proceed. However, in an Electron app, you don’t want the user to be redirected to an external URL. The redirect URL only serves as a key that the user has been authenticated.
Another difference between an authentication flow for the web and for an Electron app is that user flows on the web can assume a user is connected to the internet, but an electron app needs to manage users who are offline as well as online. This requires some planning by the product team to determine the user flow when initially offline and unable to authenticate. Our app has some capabilities that don’t require authentication, so we limit the experience for an unauthenticated user and have them log in when they are back online.
Configuring Auth0 and the API to get started
To get started, there is a lot of configuring in Auth0 and on the API, which needs to be in place before hooking up the Electron app. Luckily, there are some great tutorials that walk through that process, like this one. You can follow along with that tutorial, like we did, to get going. The rest of this article will help with the additional work we needed to do to tie everything together, including migrating some of the code to a more functional style, managing encryption through electron’s safe storage, handling launching the app while offline, and refreshing tokens when an access token becomes invalid.
Updates to Match the Functional Style Code
Following the guide, we made minor updates to match our more functional style code; most of that code is included in the appendix. As another minor update from the tutorial, we moved away from managing encryption through node-keytar. Instead, we used Electron’s built-in string encryption API with safeStorage, with a little help from this guide, which creates a service for encrypting and storing the refresh token.
// services/keyService.ts
import { safeStorage } from 'electron';
import Store from 'electron-store';
const store = new Store<Record<string, string>>({
name: '<your store name>',
watch: true,
encryptionKey: '<your encryption key>',
});
export default {
setToken(key: string, token: string) {
const buffer = safeStorage.encryptString(token);
store.set(key, buffer.toString('latin1'));
},
deleteToken(key: string) {
store.delete(key);
},
getToken(key: string): string {
return safeStorage.decryptString(Buffer.from(store.get(key), 'latin1'));
},
};
A Flow for Offline
A flow that we needed to address that wasn’t in the guide is what to do when a user launches the app while offline. The general flow when starting the app is for the main thread to decide whether to open an Auth0 authentication window if the user is not authenticated or to open the window that renders the app with an authenticated user. This flow, however, requires the device to be online to make the call to Auth0 initially to fetch access and refresh tokens. If that call fails, the assumption is that the user is not authenticated, so the main thread opens the Auth0 authentication window. This also requires the ability to connect to the Auth0 URL so the user can log in. We needed a third flow for the user being offline.
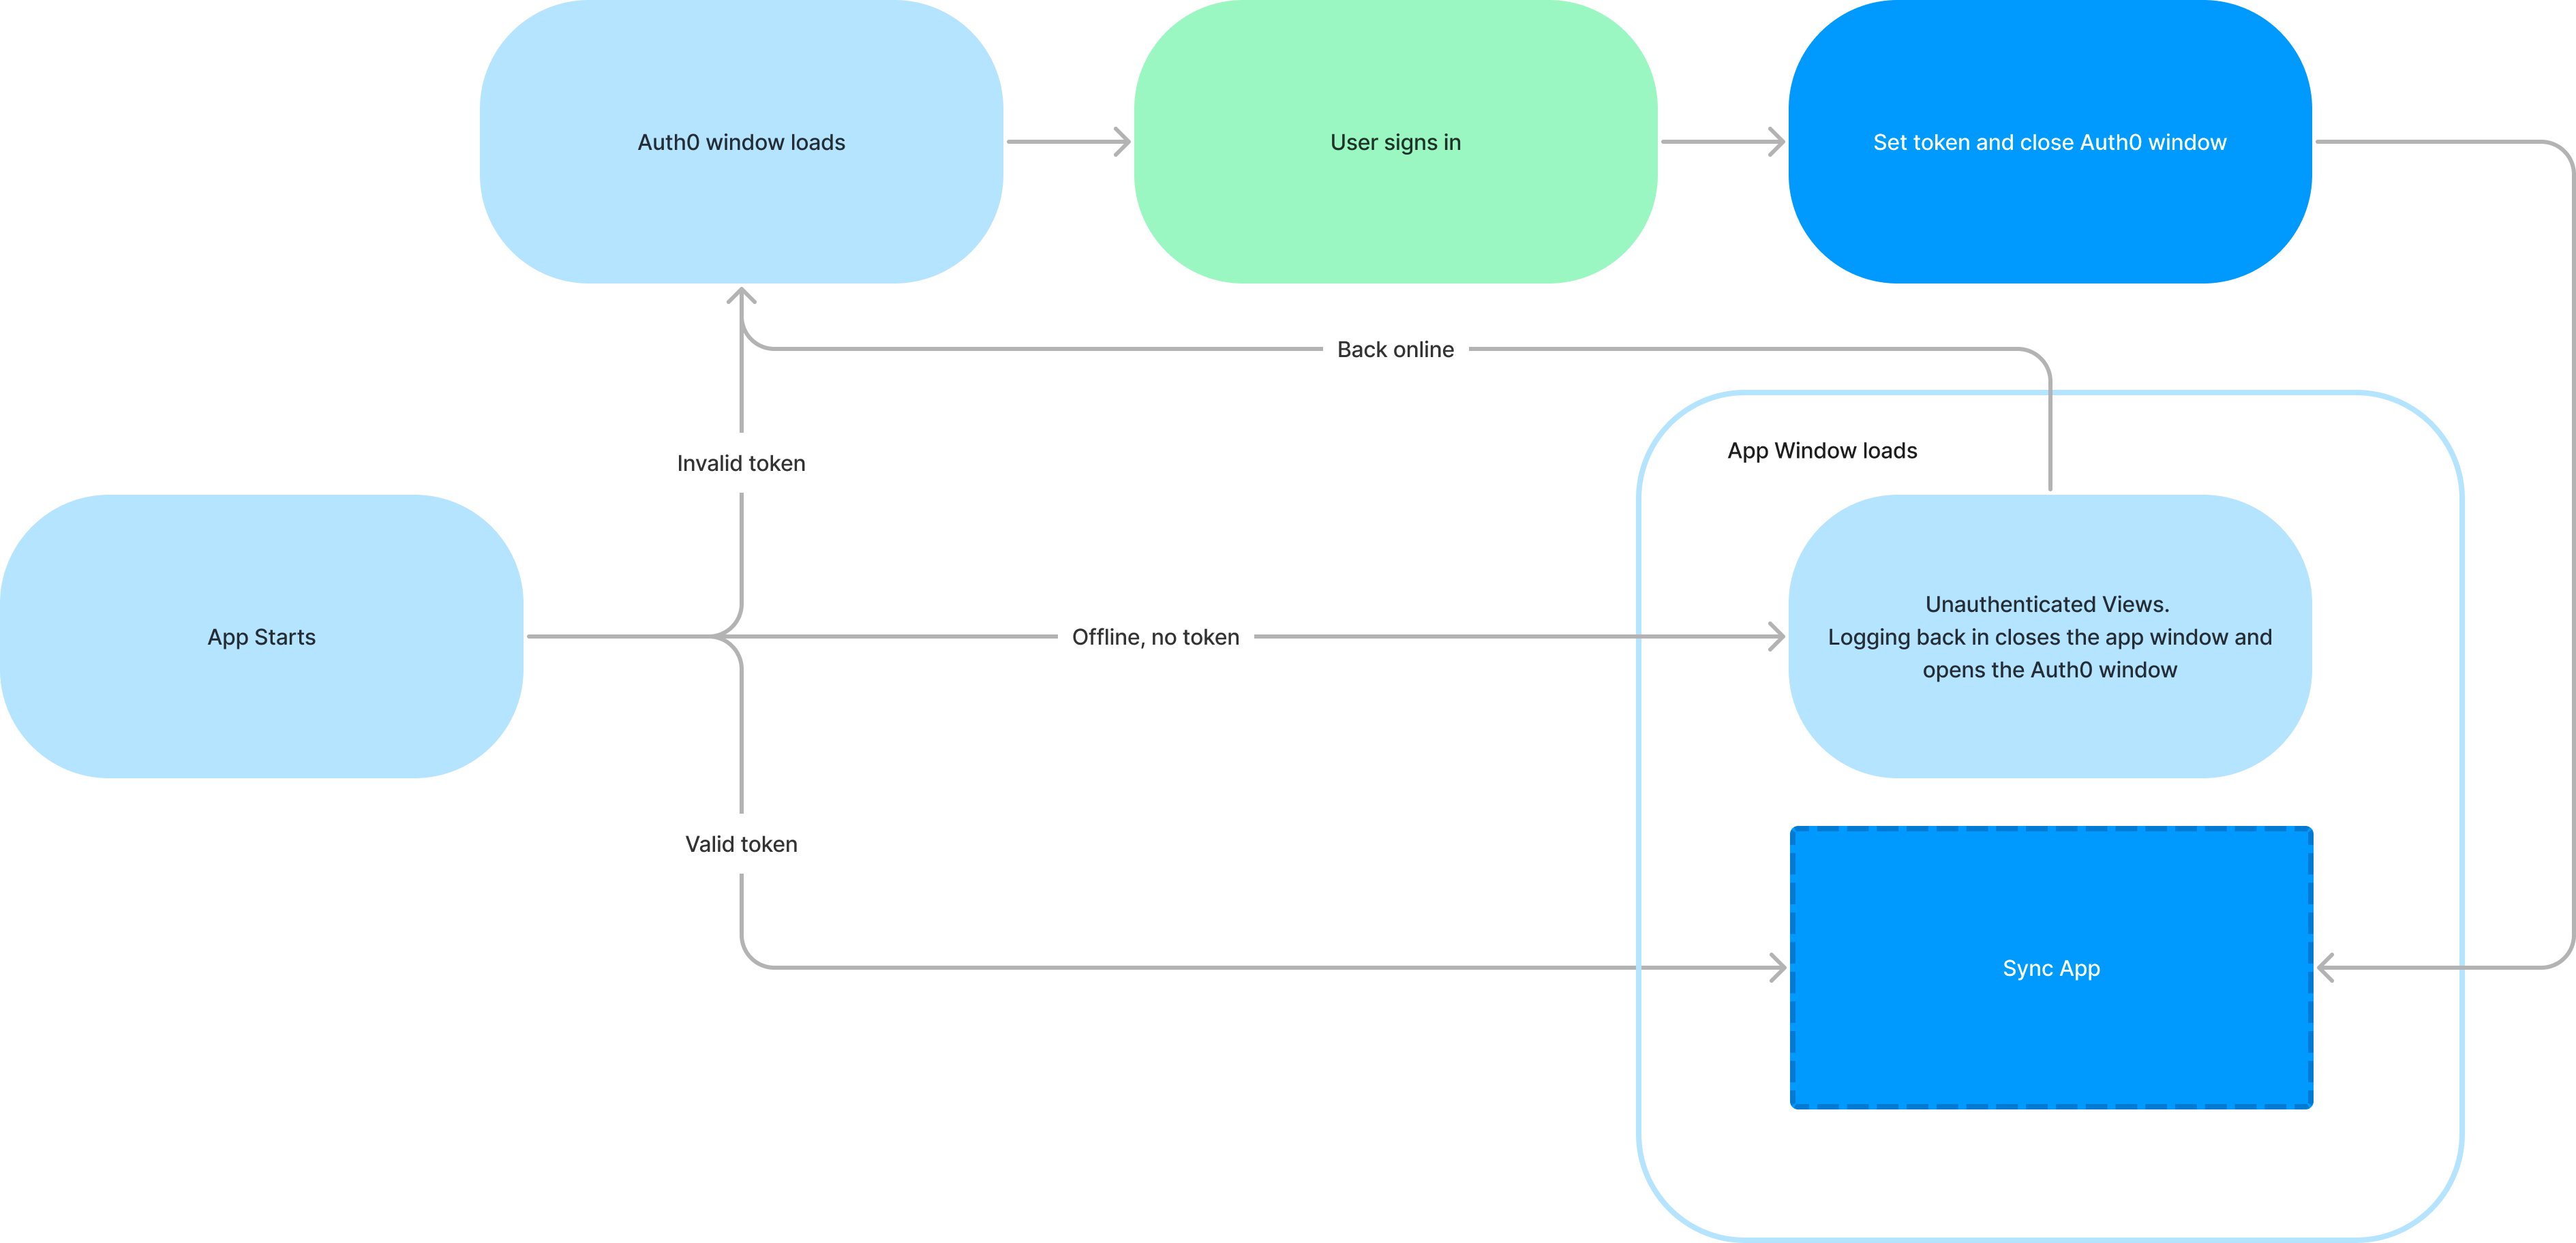
We resolved this by checking for an internet connection if the initial call to Auth0 fails. If the app is not connected and has no valid access token, we render the app window but present the unauthenticated user with limited functionality in the app until they are able to get back online and authenticate.
// main.ts
export const showWindow = async (options = { width: WINDOW_WIDTH, height: WINDOW_HEIGHT }) => {
let connected = false;
try {
await refreshTokens();
return createWindow(options);
} catch (error) {
// needed when offline
dns.resolve('my-app-url.com', (err) => {
connected = !err;
if (connected) {
createAuthWindow(options);
} else {
createWindow(options);
}
});
}
};
Refreshing Tokens
Once a user is authenticated, we can use their access token on every request to the API. If a user’s access token expires, the API will return a status code 401 to indicate that the user is not authenticated. We built in a middleware that handles an unauthenticated response by using the refresh token to get a fresh access token and try the call again. This allows a user to have a seamless experience, even while their access tokens are being retired regularly to keep a high level of security.
// main.ts
ipcMain.handle('refresh-token', async () => {
try {
await refreshTokens();
return { result: getAccessToken() };
} catch (err) {
return { error: 'Unable to refresh token' };
}
});
// api/apiHook.ts
const baseFetch = async (url, fetchOptions, attempts = 0) => {
try {
const response = await fetch(url, fetchOptions);
if (response.status === 401) {
if (attempts === 0) {
const { error, result: token } = await ipcRenderer.invoke('refresh-token');
if (error) {
baseFetch(url, fetchOptions, attempts + 1);
} else {
baseFetch(
url,
{ ...fetchOptions, headers: { ...fetchOptions.headers, ...authHeaders(token) } },
attempts + 1
);
}
}
return { success: false, status: 401 };
}
const payload = await response.json();
return { success: true, ...payload };
} catch (err) {
console.error(err);
return { success: false };
}
Conclusion
Moving to a separate authentication service with Auth0 allows our clients to manage security without impacting the user experience on the apps the users have access to. It also completely offloads the login process to Auth0. With a few amendments to the guides provided by Auth0, we were able to set up our Electron app with a new, more secure flow for users. We hope this helps you get set up quickly with Auth0.
Appendix
// main.ts

import { createAuthWindow, createLogoutWindow } from './main/authProcess';
import { app, BrowserWindow, ipcMain } from 'electron';
import dns from 'dns';

export const createWindow = (options = { width: WINDOW_WIDTH, height: WINDOW_HEIGHT }): void => {
  const mainWindow = new BrowserWindow({
    ...options,
    webPreferences: {
      nodeIntegration: true,
      contextIsolation: false,
      preload: MAIN_WINDOW_PRELOAD_WEBPACK_ENTRY,
    },
  });

  ...
 };

ipcMain.on('logout-window', (event, data) => {
  createLogoutWindow();
});

ipcMain.on('login-window', (event, data) => {
  BrowserWindow.getAllWindows().forEach((win) => win.close());
  createAuthWindow();
});

ipcMain.handle('refresh-token', async () => {
  try {
    await refreshTokens();
    return { result: getAccessToken() };
  } catch (err) {
    return { error: 'Unable to refresh token' };
  }
});

export const showWindow = async (options = { width: WINDOW_WIDTH, height: WINDOW_HEIGHT }) => {
  let connected = false;
  try {
    await refreshTokens();
    return createWindow(options);
  } catch (error) {
    // needed when offline
    dns.resolve('my-app-url.com', (err) => {
      connected = !err;
      if (connected) {
        createAuthWindow(options);
      } else {
        createWindow(options);
      }
    });
  }
};


app.on('ready', async () => {
   ...
  showWindow();
});
// main/authProcess.ts

import { BrowserWindow } from 'electron';
import { getAuthenticationURL, loadTokens, getLogOutUrl, logout } from '../services/authService';
import { createWindow, showWindow } from '../main';
import { WINDOW_WIDTH, WINDOW_HEIGHT } from '../constants';

let win = null;

export const createAuthWindow = (options = { width: WINDOW_WIDTH, height: WINDOW_HEIGHT }) => {
  destroyAuthWin();

  win = new BrowserWindow({
    ...options,
    webPreferences: {
      nodeIntegration: false,
    },
  });

  win.loadURL(getAuthenticationURL());

  const {
    session: { webRequest },
  } = win.webContents;

  const filter = {
    urls: ['http://localhost/callback*'],
  };

  webRequest.onBeforeRequest(filter, async ({ url }) => {
    try {
      await loadTokens(url);
      createWindow({ width: options.width, height: options.height });
      return destroyAuthWin();
    } catch (e) {
      createLogoutWindow();
      return destroyAuthWin();
    }
  });

  win.on('authenticated', () => {
    destroyAuthWin();
  });

  win.on('closed', () => {
    win = null;
  });
};

export const destroyAuthWin = () => {
  if (!win) return;

  win.close();
  win = null;
};

export const createLogoutWindow = () => {
  const logoutWindow = new BrowserWindow({
    show: false,
  });

  logoutWindow.loadURL(getLogOutUrl());

  logoutWindow.on('ready-to-show', async () => {
    BrowserWindow.getAllWindows().forEach((win) => win.close());
    await logout();
    createAuthWindow();
  });
};
// services/authService.ts

import jwtDecode from 'jwt-decode';
import axios from 'axios';
import url from 'url';
import fetch from 'electron-fetch';

import { ENVIRONMENT, environments } from '../env';
import keyService from './keyService';

const config = {
  auth0Domain: "<your Auth0 domain>",
  clientId: "<your Auth0 client ID>",
  apiIdentifier: "<your Auth0 apiIdentifier>",
  scope: 'openid profile offline_access',
};

const { apiIdentifier, auth0Domain, clientId, scope } = config;
const redirectUri = 'http://localhost/callback';
const refreshKey = 'refresh-token';

let accessToken = null;
let profile = null;
let refreshToken = null;

export const getAccessToken = () => {
  return accessToken;
};

export const getProfile = () => {
  return profile;
};

export const getAuthenticationURL = () => {
  return (
    `https://${auth0Domain}/authorize?` +
    `audience=${apiIdentifier}&` +
    `scope=${scope}&` +
    'response_type=code&' +
    `client_id=${clientId}&` +
    `redirect_uri=${redirectUri}`
  );
};

export const refreshTokens = async () => {
  let refreshToken = await keyService.getToken(refreshKey);

  if (refreshToken) {
    const options = {
      method: 'POST',
      url: `https://${auth0Domain}/oauth/token`,
      headers: { 'content-type': 'application/json' },
      data: {
        grant_type: 'refresh_token',
        client_id: clientId,
        refresh_token: refreshToken,
      },
    };

    try {
      const response = await axios(options);
      accessToken = response.data.access_token;
      profile = jwtDecode(response.data.id_token);
      refreshToken = response.data.refresh_token;
      if (refreshToken) {
        await keyService.setToken(refreshKey, refreshToken);
      }
    } catch (error) {
      await logout();
      throw error;
    }
  } else {
    throw new Error('No available refresh token.');
  }
};

export const loadTokens = async (callbackURL) => {
  const urlParts = url.parse(callbackURL, true);
  const query = urlParts.query;

  const exchangeOptions = {
    grant_type: 'authorization_code',
    client_id: clientId,
    code: query.code,
    redirect_uri: redirectUri,
  };

  const options = {
    method: 'POST',
    url: `https://${auth0Domain}/oauth/token`,
    headers: {
      'content-type': 'application/json',
    },
    data: JSON.stringify(exchangeOptions),
  };

  try {
    const response = await axios(options);

    accessToken = response.data.access_token;
    profile = jwtDecode(response.data.id_token);
    refreshToken = response.data.refresh_token;

    if (refreshToken) {
      await keyService.setToken(refreshKey, refreshToken);
    }
  } catch (error) {
    await logout();
    await fetch(getLogOutUrl(), options);
    throw error;
  }
};

export const logout = async () => {
  await keyService.deleteToken(refreshKey);
  accessToken = null;
  profile = null;
  refreshToken = null;
};

export const getLogOutUrl = () => {
  return `https://${auth0Domain}/v2/logout`;
};


