

Animations and gestures can create the most satisfying user experiences within a mobile app. They make an app feel smooth, fluid, alive, and high quality... common traits among the most popular apps. Without this level of polish, your app will struggle to stand out.
Fortunately, a React Native app can be as smooth and fast as a native app if properly optimized. How? By taking advantage of the UI thread for gestures and animations. Here, we'll explore what the UI thread is in React Native, how to get smooth (60 frames per second!) animations and gestures on any device, and share an example with code.
What is the UI thread?
In React Native there are two threads we have available to us, the JavaScript thread and the UI thread (also can be referred to as the “main thread”). The JS thread is where the React App lives. All of the JS code is executed here which includes everything from api calls to touch events in the app. The UI thread runs the native code necessary to display what the user will see and interact with.
Working together: JS and UI Threads
The JS and UI threads work together during an iteration called the event loop. During this loop, all of the updates from the JS thread are batched and sent over to the native side where the native-backed views will be updated. All of this will happen within a frame deadline in the event loop. Each frame lasts around 16.67ms, and with these apps it will run at 60 frames per second.
The user experience matters
Slow animations and interactions within an app will make it feel unresponsive, and an incomplete product. When the app is unable to complete the action that is sent over from the JS thread to the UI thread, this is when we experience frame drops. If enough frames are dropped, typically when it gets closer to 100ms to complete an action, this is when users will really start feeling like they are using an unresponsive app.
App crashes have led to 71% of app uninstalls, while freezing amounts to 76%. Research showed that 59% of customers uninstall an app if it’s too slow.
AppSamurai
The reason an app could have incomplete actions in the frame is if the JS thread is busy. If the app is relying on JS animations and touch events this is when you can expect to see unresponsive behavior. Gesture events will not fire off as soon as they are interacted with and animations could appear stuttering and sluggish. This example from the React Native documentation describes an instance with TouchableOpacity being delayed by the JS thread.
Responding to touches: if you are doing work across multiple frames on the JS thread, you might notice a delay in responding to
TouchableOpacity, for example. This is because the JS thread is busy and cannot process the raw touch events sent over from the main thread. As a result,TouchableOpacitycannot react to the touch events and command the native view to adjust its opacity.
Using the UI thread
React Native comes with a built-in option to immediately start taking advantage of this with the Animated api. It is a good way to get basic animations going, but it does have its limitations. Using this api, not everything is supported to use the native driver. Only properties that do not change the layout can be animated, like opacity and transform.
Check out the React Native documentation on the Animated API to get a better overview of the limitations. There are two libraries that work extremely well together and give you very fine control over every aspect of the animation or gesture.
React Native Reanimated
React Native Gesture Handler
Reanimated provides a more comprehensive, low level abstraction for the Animated library API, giving you much greater flexibility, control, and performance. It is not typical JavaScript syntax and has a big learning curve, but is worth the effort. There is a V2 on the way that will be easier to read and write, and will work with existing V1 code! It is currently in alpha so keep that on your radar when it is more production ready.
With React Native Gesture Handler, gestures are no longer controlled by the JS responder system, but instead are recognized and tracked in the UI thread. It makes touch interactions and gesture tracking not only smooth, but also dependable and deterministic.
Using these two will allow you to declare everything once in JavaScript and it will be sent over the bridge to the UI thread where it will be executed there. It will no longer require the JS thread for these gestures and animations, giving you a great user experience on any device.
UI Thread Animation Example: See it in action!
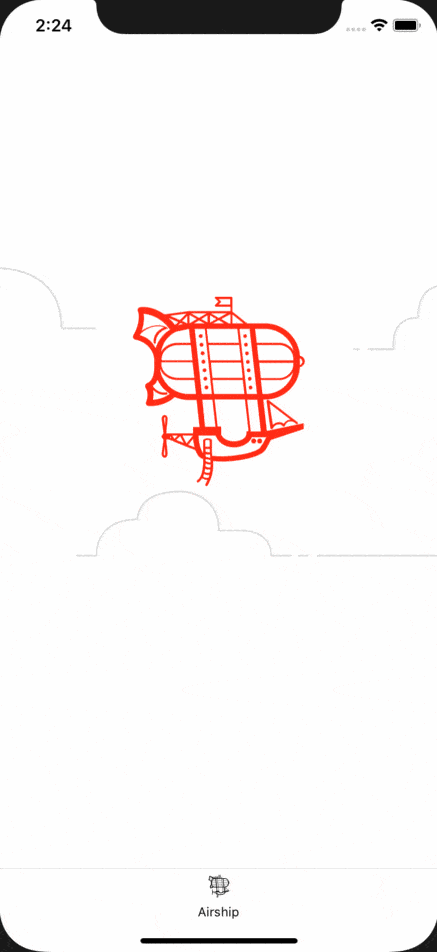
I created a quick example of an animation entirely using the UI thread. I only used react-native-reanimated and react-native-redash (an awesome toolbelt of functions for reanimated and gesture handler!) in this example to create the animation. It is a loop of the Airship logo bobbing in the sky along the y-axis with clouds in the background slowly going back and forth along the x-axis.
I’ll start with using these imports.
import React from 'react';
import { StyleSheet, View, Image } from 'react-native';
import Animated, {
  Value,
  useCode,
  startClock,
  set,
  block,
  timing,
  Easing,
  cond,
  eq,
  not,
  clockRunning,
  interpolate,
  Extrapolate,
} from 'react-native-reanimated';
import { useClock, useValue } from 'react-native-redash';
import Airship from './SVG/Airship';
Reanimated will have quite a few items imported, but that is because we are not writing JS for these animations. For example, we do not write imperative instructions such as
const progress = runTiming(clock);This will run on the JavaScript thread.
We would write that as
set(progress, runTiming(clock))These are declarative animation nodes that will be executed on the UI thread.
So for the two items, Airship logo and the clouds, I have them both running on their own clock from reanimated and it’s x or y position will be changed during the course of the animation. The clock keeps up with the frames by having its timestamp updated during each frame. I use the useClock hook from react-native-redash to preserve it during a component’s lifecycle and re-renders.
const airshipClock = useClock();
const cloudsClock = useClock();
I do the same for the progress values.
const airshipProgress = useValue(0);
const cloudsProgress = useValue(0);
The x and y positions of the two elements are kept in these variables and are updated as the progress changes. It is wrapped by interpolate which allows you to map a value within a range, and extrapolate allows you to define what happens when it goes outside the range.
const airshipPositionY = interpolate(airshipProgress, {
    inputRange: [0, 1],
    outputRange: [0, 30],
    extrapolate: Extrapolate.CLAMP,
  });

  const cloudsPositionX = interpolate(cloudsProgress, {
    inputRange: [0, 1],
    outputRange: [-30, -80],
    extrapolate: Extrapolate.CLAMP,
  });
You can refer to the documentation for react-native-reanimated or react-native-redash for more explanations of the functions and different usages!
Next up I will use the hook from reanimated useCode to run the animation code to update the airshipPositionY and cloudsPositionX using each of the progress variables.
useCode(
    () => [
      cond(not(clockRunning(airshipClock)), startClock(airshipClock)),
      set(airshipProgress, runTiming(airshipClock, 2000)),
      cond(not(clockRunning(cloudsClock)), startClock(cloudsClock)),
      set(cloudsProgress, runTiming(cloudsClock, 8000)),
    ],
    [],
  );
The runTiming function is one I created to start the clocks and define what will happen when the state of the animation begins and ends.
const runTiming = (clock, duration) => {
  const state = {
    finished: new Value(0),
    position: new Value(0),
    frameTime: new Value(0),
    time: new Value(0),
  };
  const config = {
    toValue: new Value(1),
    duration,
    easing: Easing.inOut(Easing.ease),
  };
  return block([
    timing(clock, state, config),
    cond(eq(state.finished, 1), [
      set(state.finished, 0),
      set(state.frameTime, 0),
      set(state.time, 0),
      set(config.toValue, not(state.position)),
    ]),
    state.position,
  ]);
};
Now to apply the position values to the Animated.View components. If you try and apply it to a regular View component, the app will crash so be sure you are adding Animated from reanimated.
<View style={styles.container}>
      <View style={styles.airshipContainer}>
        <Animated.View
          style={[
            styles.airship,
            { transform: [{ translateY: airshipPositionY }] },
          ]}>
          <Airship fillColor="#FF2A13" />
        </Animated.View>
      </View>
      <View style={styles.cloudsContainer}>
        <Animated.View style=>
          <Image
            source={require('../../assets/home-header-bg.jpg')}
            style={styles.clouds}
          />
        </Animated.View>
      </View>
    </View>
And that’s it, two different items that will animate completely on the UI thread, and will be at a constant smooth 60 frames per second no matter what JS background tasks are running!
Smooth sailing (and animations) from here
There is no question getting into animations and gesture handlers that are purely native driven in React Native is difficult to learn at first. Getting past this is a huge step in creating amazing user experiences for your app, and giving it that extra polish to help stand out. This really gives React Native more power in feeling like a true native app, while keeping all the benefits of the single code base for two platforms.


