

fastlane ios beta
fastlane android beta
That's it. This does the following things for us: 1. Assigns the correct certificates to the build. 2. Bumps our version number for the app by 1. 3. Sets any correct environment variables in the info.plist or res/values/*.xml files 4. Assembles third party library files (you can use cocoapods or gradle) 5. Performs the primary build. 6. Ships it to iTunes connect/Google Play Store. The process for production is the same, only you say:
fastlane ios release
fastlane android release
We can also have any number of tasks we want. I just called these tasks “beta” and “release” but that's up to you. This is the real power of Fastlane. You can have as many “lanes” as you want, and you can switch lanes all you like. The best part about all this is that behind the scenes, it's just good ole Ruby. Nuthin' fancy. It would be counterproductive for me to post installation instructions here, since with most technologies, blog post instructions become woefully out of date faster than you can say “Jack Robinson.” Instead, I'll point you to the instructions on Fastlane's official docs: Okay, setup? Let me show you the ropes.
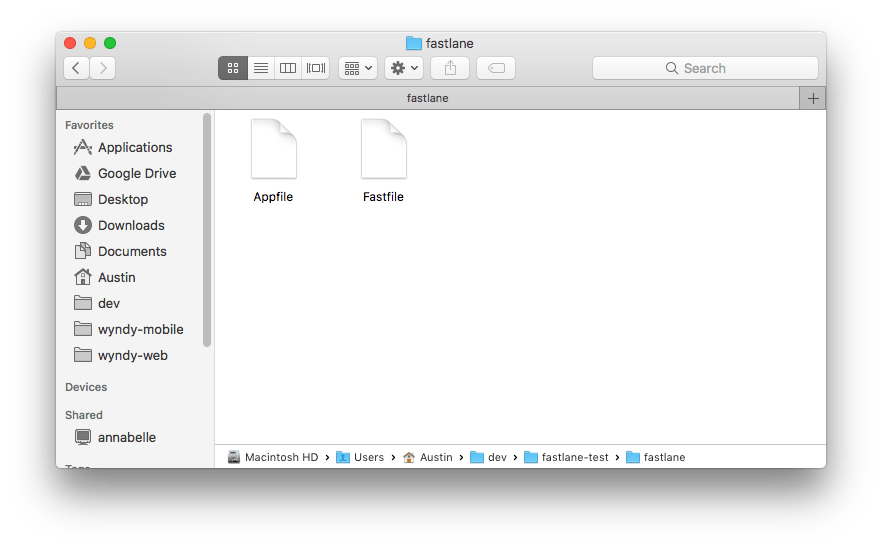 Inside our mobile project, we have a directory called “fastlane.” Everything specific to our automation scripting is contained inside this folder. We'll add some additional ones, but we'll focus on these two for now. The first file we want to look at is called the “Fastfile.” This is the brain of fastlane. It's where all our instructions live. If we open it up, we'll see a bunch of commands. I'm going to ignore a lot of that for now and just answer the question you're probably wondering: “where do I build the app and send it off to Testflight?”
platform :ios do
     lane :beta do
     # match(type: "appstore") # more information: https://codesigning.guide
     gym # Build your app - more options available
     pilot

     # sh "your_script.sh"
     # You can also use other beta testing services here (run `fastlane actions`)
end
The first thing you'll notice is that this code is just a ruby block. Nope, nothing scary. We have a “platform :ios” command that will house all the “lanes” involving ios specific code. You can also have a “platform :android” command. Inside your platform block we'll specify our lanes. The “:beta” lane is what we'll use to push to Testflight, Apple's beta app testing suite. The example above is pretty basic and likely not going to cover your needs. Most apps have more configuration than that. Here's an example of a beta lane we use at Airship:
 platform :ios do
      desc "Submit a new Beta Build to Apple TestFlight"
      desc "This will also make sure the profile is up to date"
      lane :beta do
         match(type: "appstore")
         increment_build_number(xcodeproj: './ios/client_app.xcodeproj')
         insert_fb_app_id(env: 'production')
         cocoapods(podfile: './ios/Podfile')
         gym(workspace: './ios/project.xcworkspace', scheme: 'client_app')
         pilot

         insert_fb_app_id(env: 'development') #switch back to dev
       end
  end

  platform :android do
    desc "Deploy a new version to the Google Play Store"
     lane :alpha do
       deploy(track: 'alpha')
     end

     lane :beta do
       deploy(track: 'beta', env: 'production')
     end

     lane :deploy do |options|
       bump_version_code
       insert_fb_app_id(env: options[:env])

       gradle \
         task: "clean",
         project_dir: "./android"

       gradle(
         task: "assemble",
         build_type: "Release",
         project_dir: "./android"
       )

       signed = sign_apk(
         apk_path: "./android/app/build/outputs/apk/app-release-unsigned.apk",
         keystore_path: "./fastlane/project.jks",
         alias: "project"
       )

       zipalign(apk_path: "#{lane_context[SharedValues::SIGNED_APK_PATH]}")

       supply(
         track: options[:track],
         json_key: "fastlane/key.json",
         package_name: "com.project",
         apk: "#{lane_context[SharedValues::SIGNED_APK_PATH]}"
       )

       insert_fb_app_id(env: 'development') #switch back to dev
     end
  end
There's quite a bit happening here, so let's look at it section by section.
Match
The first thing we do is run a command called “match.” What's match do? Match is one of many tools in Fastlane's belt. You can find a full list here. Match, in particular, helps us manage code signing for the tangled mess that is iOS provisioning. Match will automatically create the required provisioning profiles and certificates we need and store them in a private git repository. This is nice because our whole team can access those same credentials and we don't have to deal with each team member having separate certificates or profiles. Match will also automatically pull down existing certificates and provisioning profiles if they already exist. In fact, we made a lane in our Fastfile just to do this:desc "Sync certificates to local machine" lane :certificates do match(app_identifier: "com.app_identifier", type: "appstore") match(app_identifier: "com.app_identifier", type: "development") endNow when a developer pulls down the source code for a mobile project and wants to begin working, they can just run
fastlane ios certificatesThis will sync the development and appstore certificates to their machine. In order to do this we need to run the match setup. You can find that here.
Increment Build Number
The next line you'll notice in our beta lane is this:increment_build_number(xcodeproj: './ios/client_app.xcodeproj')This does exactly what it says: it bumps our version number up by one. If you have version 1.0.52, calling this command will bump it to 1.0.53. If that doesn't work for you, don't stress: you can pass in an argument like so:
increment_build_number(build_number: 'x.y.z')Note that there's a variation of this command called increment_version_number(bump_type: 'major|minor|patch'). The version number isn't really needed for beta builds, since it just helps end users distinguish between versions of the app. Testflight will be perfectly content with you keeping the same version number as long as your build number gets incremented. However, we will need increment_version_number for our fastlane ios release command. For now, we'll just ignore that.
Incrementing the Build Number in Android
Unfortunately for Android, there's not currently a built-in command to bump the version number. No worries, though! We can do the exact same thing like so: platform :android do
lane :bump_version_code do
path = '../android/app/build.gradle'
re = /versionCode\s+(\d+)/
s = File.read(path)
versionCode = s[re, 1].to_i
s[re, 1] = (versionCode + 1).to_s
f = File.new(path, 'w')
f.write(s)
f.close
end
end
Android stores a setting called versionCode in the app's build.gradle file. Normally we'd have to manually update that every time we want to deploy. What we do here is read in the version code, bump it up one, and write it back out to disk. A little messy, but not too bad.
A word about tagging versions
Note that after the fastlane ios build command is run, your project files will have changed a bit. It's always a good idea to keep these in sync with our version control system. To do that, we'd want to make sure we always run our fastlane ios beta command from the master branch. Then we want to make sure the following files get committed: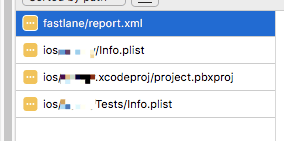 The report.xml file will give you a report of what happened in the last build. This is handy for when your new shiny app crashes on level 37, whereas it used to work fine. The other files are ones that XCode keeps for maintaining settings. You'll want to commit the lines that involve the updated build number. The other thing you'll want to do is make sure to tag your git version with the current build of your app. Here's an example of that:
 git tag "v1.0.57"
 git push --tags origin
Doing this helps you identify exactly what's in your release, which is really handy for debugging issues where something used to work in version 1.0.56 but not in 1.0.57.
Custom Config Settings
What's this next line all about?insert_fb_app_id(env: 'production')Here's a great example of where we're going to switch “lanes.” So put on your blinker, check your mirrors and blindspot, and hop on over to this bit of code:
 desc "Insert the Facebook App ID"
 lane :insert_fb_app_id do |options|
   env = options[:env] || 'development'
   Dotenv.load("../.env.#{env}")

   fb_app_id = ENV['FB_APP_ID']
   fb_url_scheme = "fb#{fb_app_id}"

   set_info_plist_value(path: './ios/project/Info.plist', key: 'FacebookAppID', value: fb_app_id)
   set_info_plist_value(path: './ios/project/Info.plist', key: 'CFBundleURLTypes', value: [{ CFBundleURLSchemes: [fb_url_scheme] }])
 end
The structure of this should look familiar. We have a desc line that will give the user a description of what this lane should do. The “lane” command takes an |options| argument. It's nothing more than a simple hash where we can reference any option that might be passed in. In this particular example, my goal is to set the correct Facebook App ID in my app. The reason I want to do this is because Facebook has the concept of a test App ID and a production App ID. In dev it's fine for my Info.plist to reference the test one, but since I'm deploying to real beta testers, they need the live Facebook App ID. If you were to do this manually, you basically would go into your Info.plist and update a couple of keys. Then, when you're done deploying, you'd need to set them back to use the test values. But we're not going 40 MPH in the right lane with the 18 wheelers. We're in the fastlane! That means we can do this:
 set_info_plist_value(path: './ios/project/Info.plist', key: 'FacebookAppID', value: fb_app_id)
 set_info_plist_value(path: './ios/project/Info.plist', key: 'CFBundleURLTypes', value: [{ CFBundleURLSchemes: [fb_url_scheme] }])
Here we see a handy command called set_info_plist_value. You point it to your plist file, give it a key you want to update, and then give it the value. It can support most straightforward data types. In our example we are updating a string value and an array value consisting of a dictionary. You can see that it's pretty versatile. We can use this same approach for different settings in our app. Here I've put it in a insert_fb_app_id lane, but you could have a number of lanes or a single lane called set_config_values.
A Note about Environment Variables
The other thing to note here is that we're reading in our app settings from a .env.{env} file. This is really nice because you are likely to have several configuration changes that need to change on a beta/production release. At Airship, we use the pattern of keeping a .env.development file for developers and a .env.production file for production. You could really use whatever you like (i.e. env.staging, env.beta). The trick here is that we need to know which file to load from depending on the context. In our case, we can do that like so: env = options[:env] || 'development'
Dotenv.load("../.env.#{env}")
fb_app_id = ENV['FB_APP_ID']
When we're running fastlane ios beta, we are calling insert_fb_app_id(env: 'production') before the build. After the build is over we call insert_fb_app_id() to switch the settings back to our development environment. In our code above, we read in whatever the user specifies and load the correct environment variables using dotenv. Dotenv is a gem that helps with environment variable management. It's a good idea to add it to our Gemfile. To require it, we need to put this at the top of our Fastfile so Fastlane can know about it:
fastlane_require 'dotenv'This basically works like Ruby's standard require statement, but it comes with some extra goodies in that it will do some sanity checks to tell you to ensure your library has been included in the Gemfile and outright installing the gem if it isn't yet installed. Pretty handy.
Changing Config Values in Android
set_info_plist_value works great if we're using iOS, but what if we are using Android? For this, we have another lane: fastlane_require 'nokogiri'
...
platform :android do
...
lane :insert_fb_app_id do |options|
 env = options[:env] || 'development'
 Dotenv.load("../.env.#{env}")

 fb_app_id = ENV['FB_APP_ID']
file_path = '../android/app/src/main/res/values/strings.xml'
doc = Nokogiri::XML(File.open(file_path))
fb_node = doc.at("/resources/string[@name='facebook_app_id']")
fb_node.content = fb_app_id
File.write(file_path, doc.to_xml)
end
...
end
Unfortunately, I couldn't find a good built-in way to update some of Android's config settings. Thankfully, it's just good ole XML, though. So we're requiring nokogiri, a useful XML parsing utility, to do the heavy lifting for us. We just need to open the strings.xml file that Android uses to store its string config values. Then, we search for the XML element using XPath and replace the facebook_app_id with the correct value. Then we just write the file back out to disk.
Compiling the Code
All this is wonderful, but when do we actually, you know, compile the code? We do that in the next couple of lines:cocoapods(podfile: './ios/Podfile') gym(workspace: './ios/project.xcworkspace', scheme: 'client_app')Most iOS projects use at least one CocoaPod. Why reinvent the wheel? If that's you, then fastlane's got you covered. You can just call cocoapods(podfile: '') and it will automatically compile your dependencies. This is the equivalent of running pod install before you release. The next line of code is where we actually compile our source code. Call gym and pass it a workspace file. If you're not using CocoaPods, you may pass in an xcodeproj argument instead. Also pass it your main scheme. This is important because without it you might accidentally try to deploy your tests scheme or CocoaPods scheme. Don't do that.
Compiling for Android
For Android, we need to do this to compile our code:gradle \ task: "clean", project_dir: "./android" gradle( task: "assemble", build_type: "Release", project_dir: "./android" )Gradle is Android's tool of choice for doing compilation. All we're doing here is using their Ruby SDK to call into the deploy process. The first thing we do is clean the project. This gets rid of the artifacts of previous builds so we don't accidentally redeploy old versions of the same code. Next, we run the actual compilation ( assemble) step. We make sure we're building in release mode for optimization and configuration changes. To be able to compile with Android, though, we need to sign our builds. With iOS we don't have to do this because it signs with certificates that are managed through match, the tool we discussed earlier. For Android, we sign them doing this:
 signed = sign_apk(
 apk_path: "./android/app/build/outputs/apk/app-release-unsigned.apk",
 keystore_path: "./fastlane/project.jks",
 alias: "project"
 )

 zipalign(apk_path: "#{lane_context[SharedValues::SIGNED_APK_PATH]}")
The sign_apk will take in a keystore file and attach it to our apk file to tell Google Play that it's valid. Where do you get a keystore file? Open up Android Studio, navigate to your Android project, and then click this option under the Build menu:  This will bring up a prompt asking you which module you want to use. Hit next and you'll see this screen:
 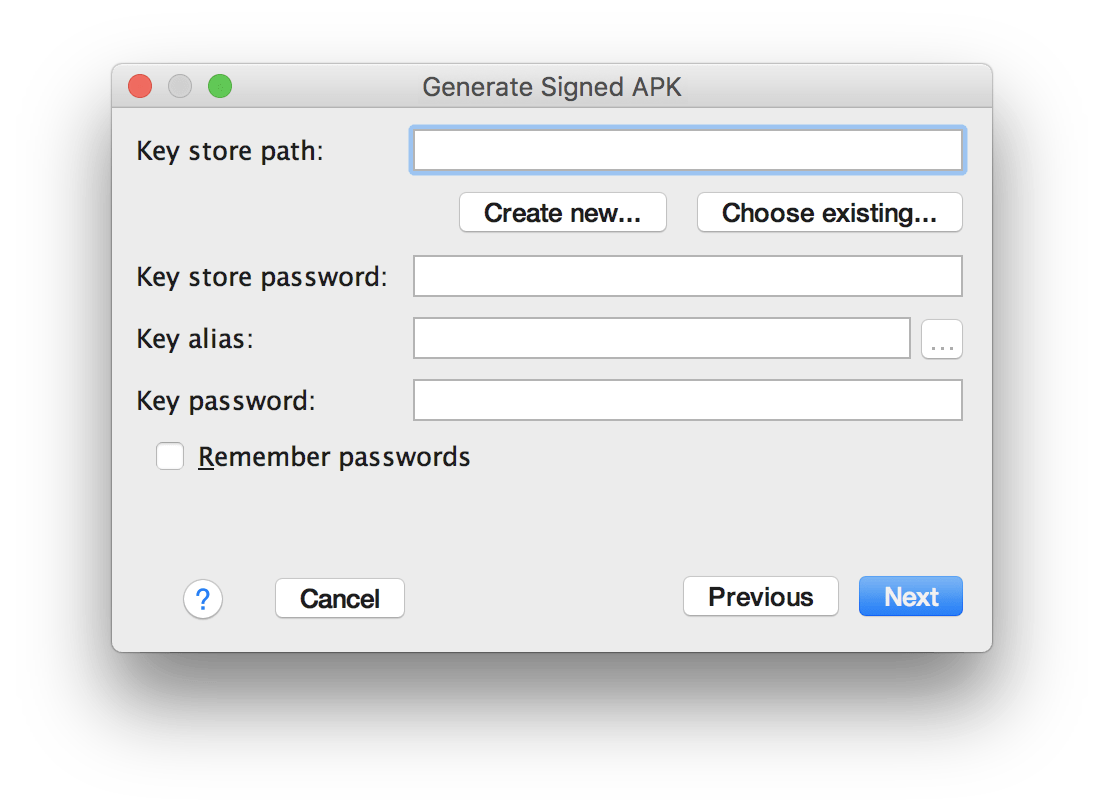 Tap “Create new...” and you'll see this:
 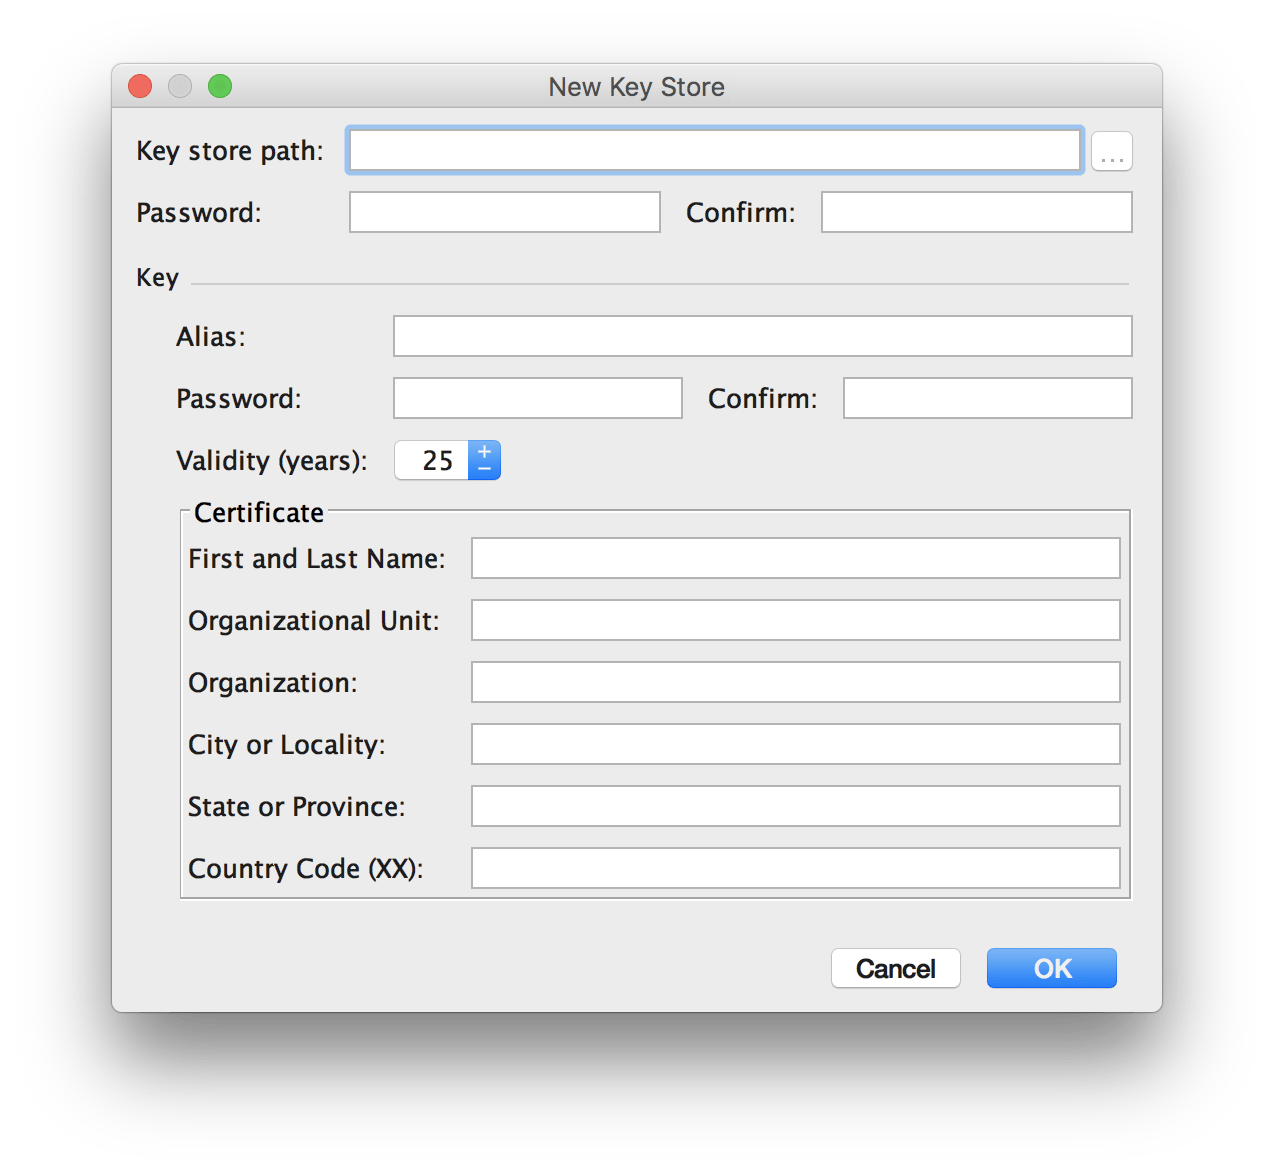 Give it a key store path of your project's fastlane directory and then fill out the rest of the info. * PLEASE, PLEASE, PLEASE REMEMBER YOUR PASSWORD! * If you lose it, you can never sign any of your project's APKs again, and you'll have to delete your entire app from the app store and start over with another project. Your hit app, Flying Fowls, will never be the same again. Tapping okay will create your keystore file that you can point to in your sign_apk command. This sign_apk command won't work out of the box. Unfortunately, you'll need to create a custom action to do it. Fortunately, it will teach you something pretty cool: Fastlane supports custom actions. Your actions go into your fastlane/actions folder. Here's what our sign_apk.rb action (that I grabbed somewhere from the internet that I can't recall) looks like: sign_apk.rb. I don't even pretend to comprehend what all wizardry is going on here. All I know is that what's cool about it is that we can define any action we want by inheriting from Fastlane's Action class and defining a self.run(params) method. You can then invoke that command in your Fastfile as you wish. Pretty cool, huh? You'll also need to install another custom action called zipalign. Here's what it looks like: zipalign.rb.
Sending Your Code To Flight
Our little code is all grown up and ready to be thrust off the virtual mountain. Will it soar among the endless heights accompanied by Angry Birds, Snapchat, and Pokemon Go, or will it crash to bits (pun intended) to the graveyard of apps that never were? Okay, that just got cheesy. Let's move on. You need to send your code to your beta users so they can decide whether your app is ready for prime time, needs some tweaking, or isn't worth a hill of beans. We can accomplish this like so:pilotYep, that's it! Well....almost. Fastlane needs your login credentials to ensure you can upload to iTunes Connect. It reads this from your Appfile. I won't go into the setup, but you can find that info here. What's cool about this is that, prior to Fastlane, we would sit around twiddling my thumbs, browsing the internet for funny cat videos like this one), getting coffee, etc. while we waited on iTunes Connect to process the build. Only after it processed it could we then go in and manually send the build to our testers. Now Fastlane will wait on iTunes to process the build and, as soon as it's done, it will send it off to our testers.
Uploading to the Google Play Store
We need to use a different command to upload to the Google Play Store. It looks like this: supply(
track: options[:track],
json_key: "fastlane/key.json",
package_name: "com.project",
apk: "#{lane_context[SharedValues::SIGNED_APK_PATH]}"
)
One cool thing to note is that Google makes it very simple to deploy to different tracks. You can have alpha, beta, and production tracks. In our case, we just pass in the track as an argument to our lane. In order to do this, we'll need to prove to Google that we're not someone maliciously uploading an apk file. To do that, we'll need to put a key.json file in our fastlane directory. Where does that come from? Refer to this article for instructions.


