

One of the most useful features in Rails 7 (but not limited to) is the addition of Turbo. Note: for the purpose of this tutorial, we’re going to focus on Turbo Frames and blissfully ignore the incredibly useful but more complex Turbo Streams. Those familiar with Turbo Links may remember that the feature would allow Rails to asynchronously load content from links in the background without needing to perform a full page reload. But as handy as that was when it worked, Turbo Links were a blunt and often times confounding instrument. There wasn’t much control when it came to targeting when and how specific elements got updated. Enter Turbo Frames.
Turbo Frames is a part of Hotwire, a bundled set of tools that allows you to replace complex, repetitive DOM-manipulating Javascript by sending HTML “over the wire.” The idea of Turbo is that a page can be divided into targeted components which can be dynamically updated when a link is clicked or a form submitted. For example, suppose you have a link which loads an item’s details in a sidebar when clicked. In traditional AJAX fashion, you would write custom Javascript to intercept the link’s click event, manually issue an AJAX request, then stuff the response’s HTML into the target div. With Turbo Frames, most of that work is done for you.
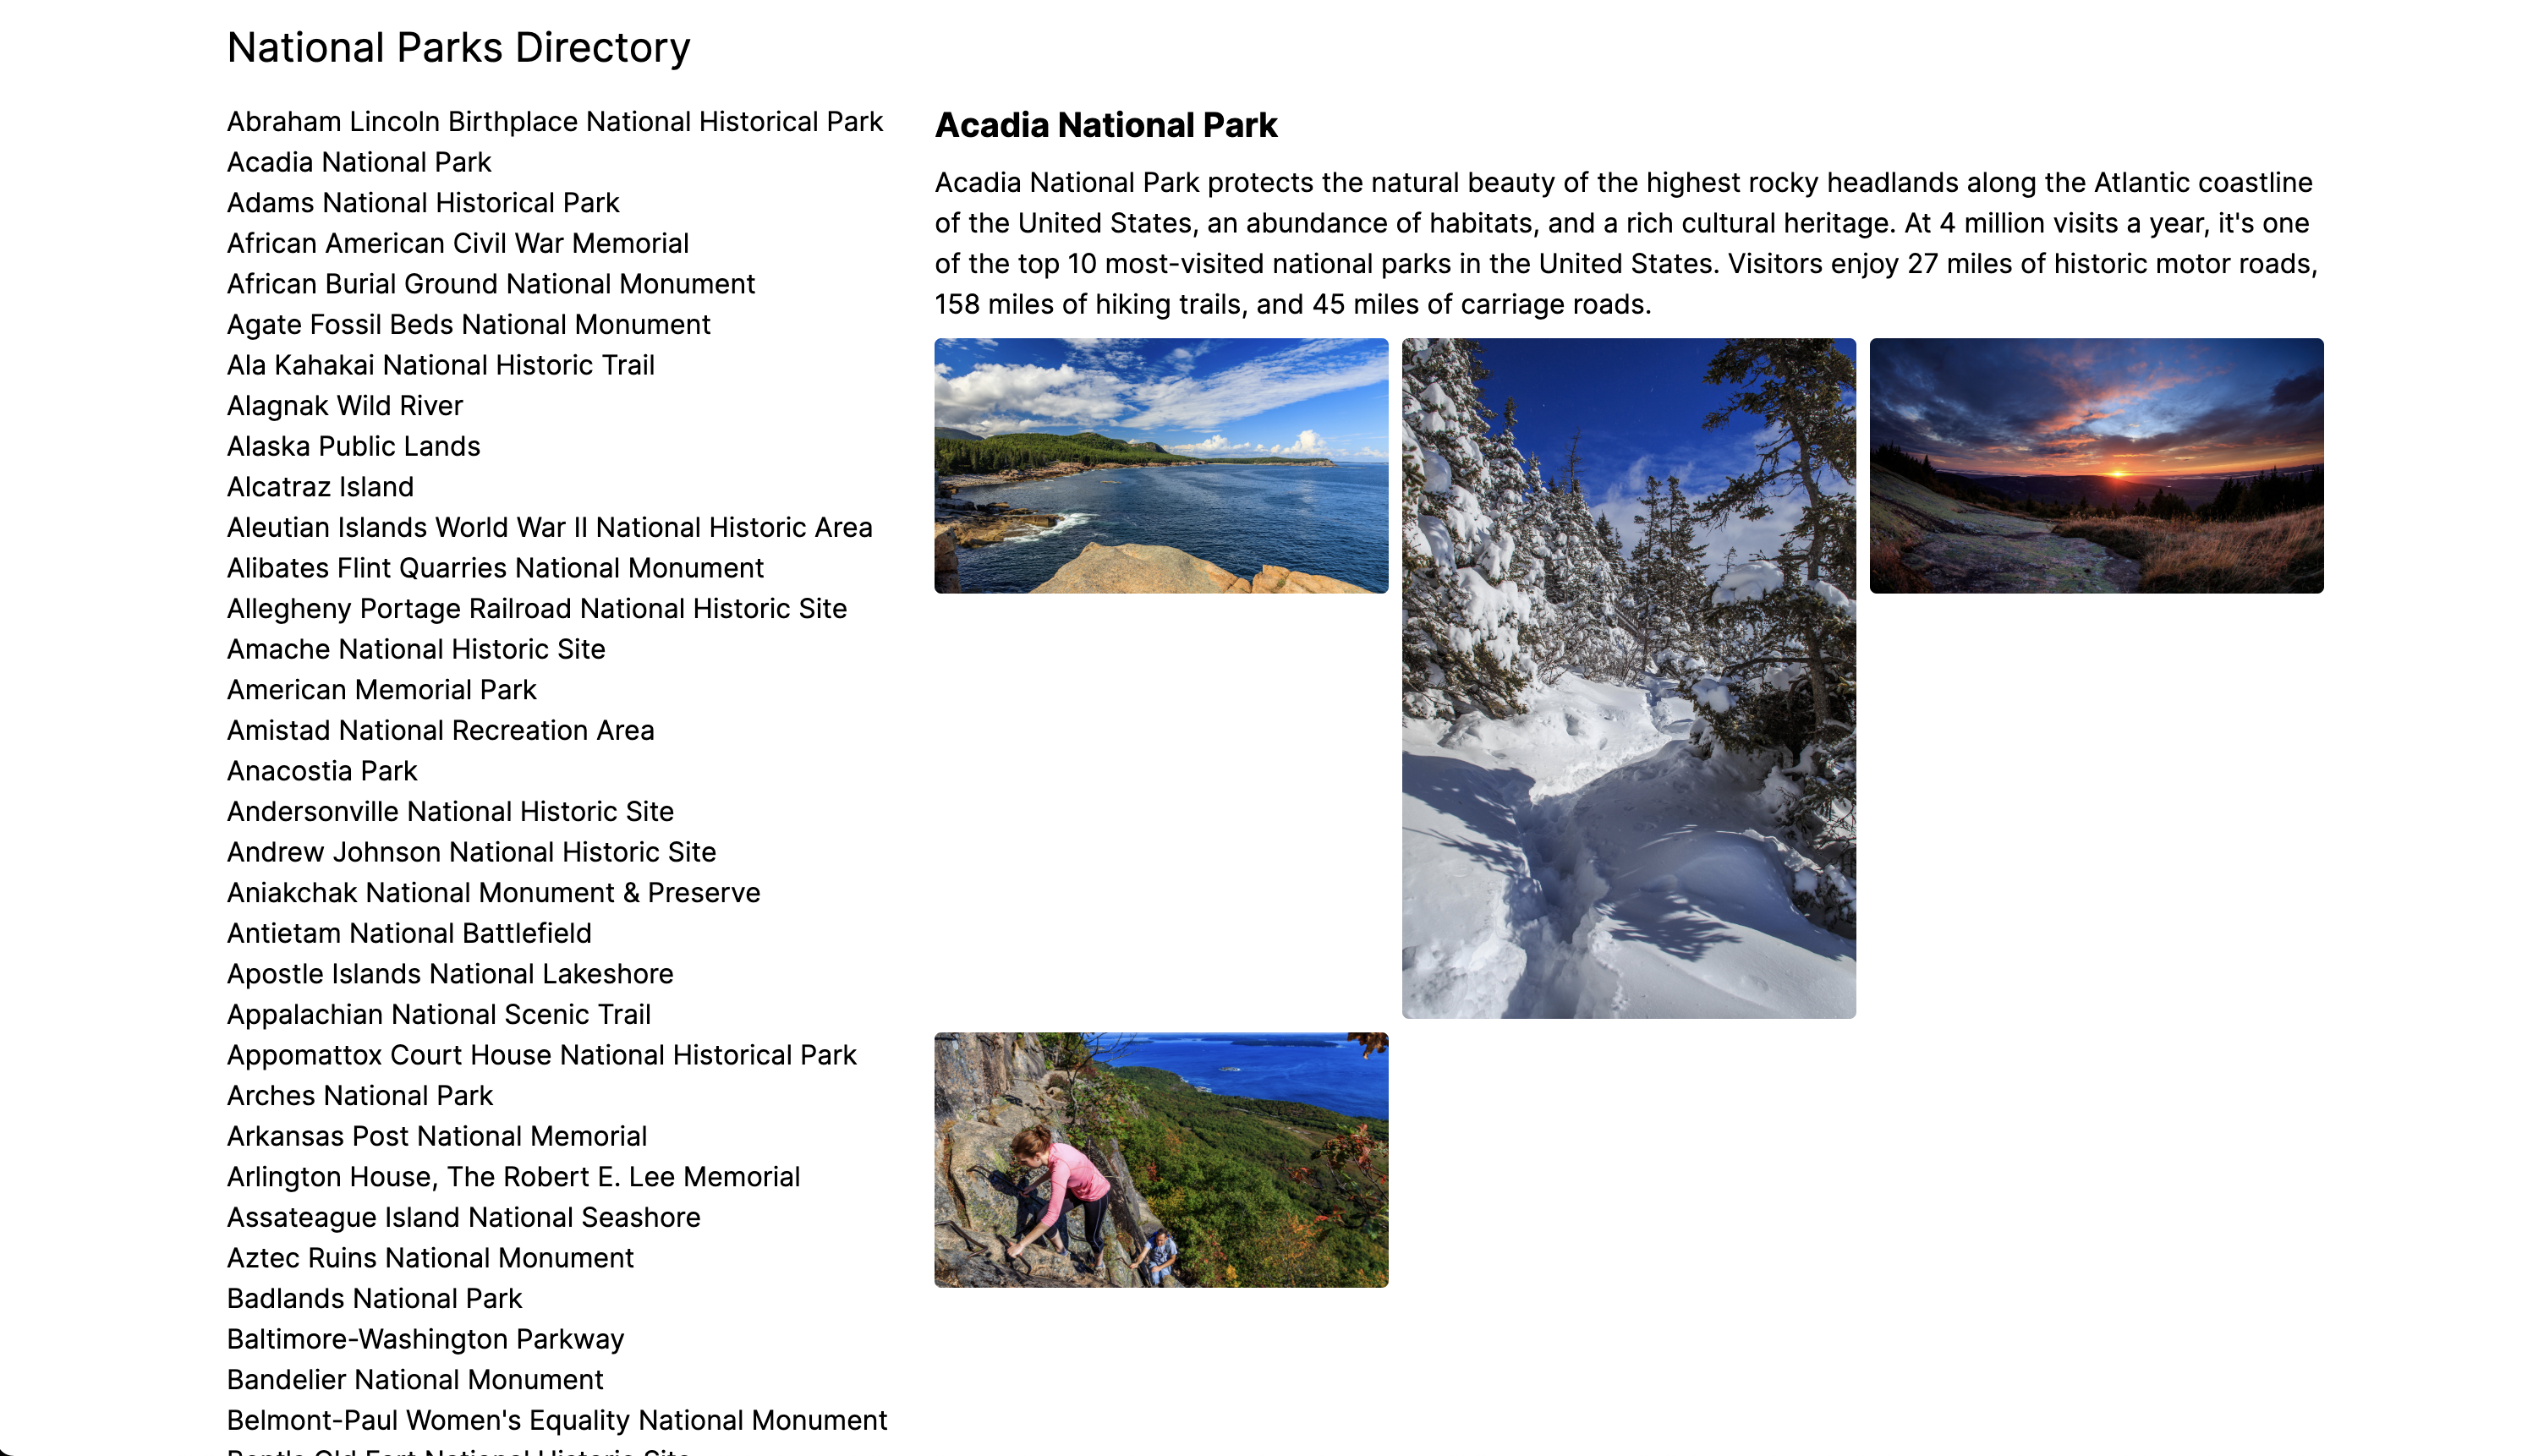
Enough theory. Let’s see this in action. We’re going to reference an example app that displays a directory of the U.S. National Parks. Clicking on a park should display its details on the right side of the screen. Here’s what the app looks like:
Note: I’m going to skip all the details for retrieving the National Park data. However, I will simply mention that the National Park Service has a really cool API that returns all kinds of useful information. I’m also going to skip the boring Rails bits you already know how to do such as controllers, routing, etc. We’re going to focus exclusively on the UI elements pertaining to turbolinks.
Step 1: Rendering the Standard Directory List
When learning Turbo Frames myself, I found it helpful to first build my app using traditional server-side rendering, then “sprinkle in” the client-side enhancements. Here’s what the standard parks/index.html.erb file looks like:
<div class="grid gap-4">
<div>
<h1 class="text-2xl">National Parks Directory</h1>
</div>
<div class="grid grid-cols-3 gap-4">
<div>
<ul>
<% @parks.each do |park| %>
<li><%= link_to park.name, park_path(park.id) %></li>
<% end %>
</ul>
</div>
<div class="col-span-2">
</div>
</div>
</div>
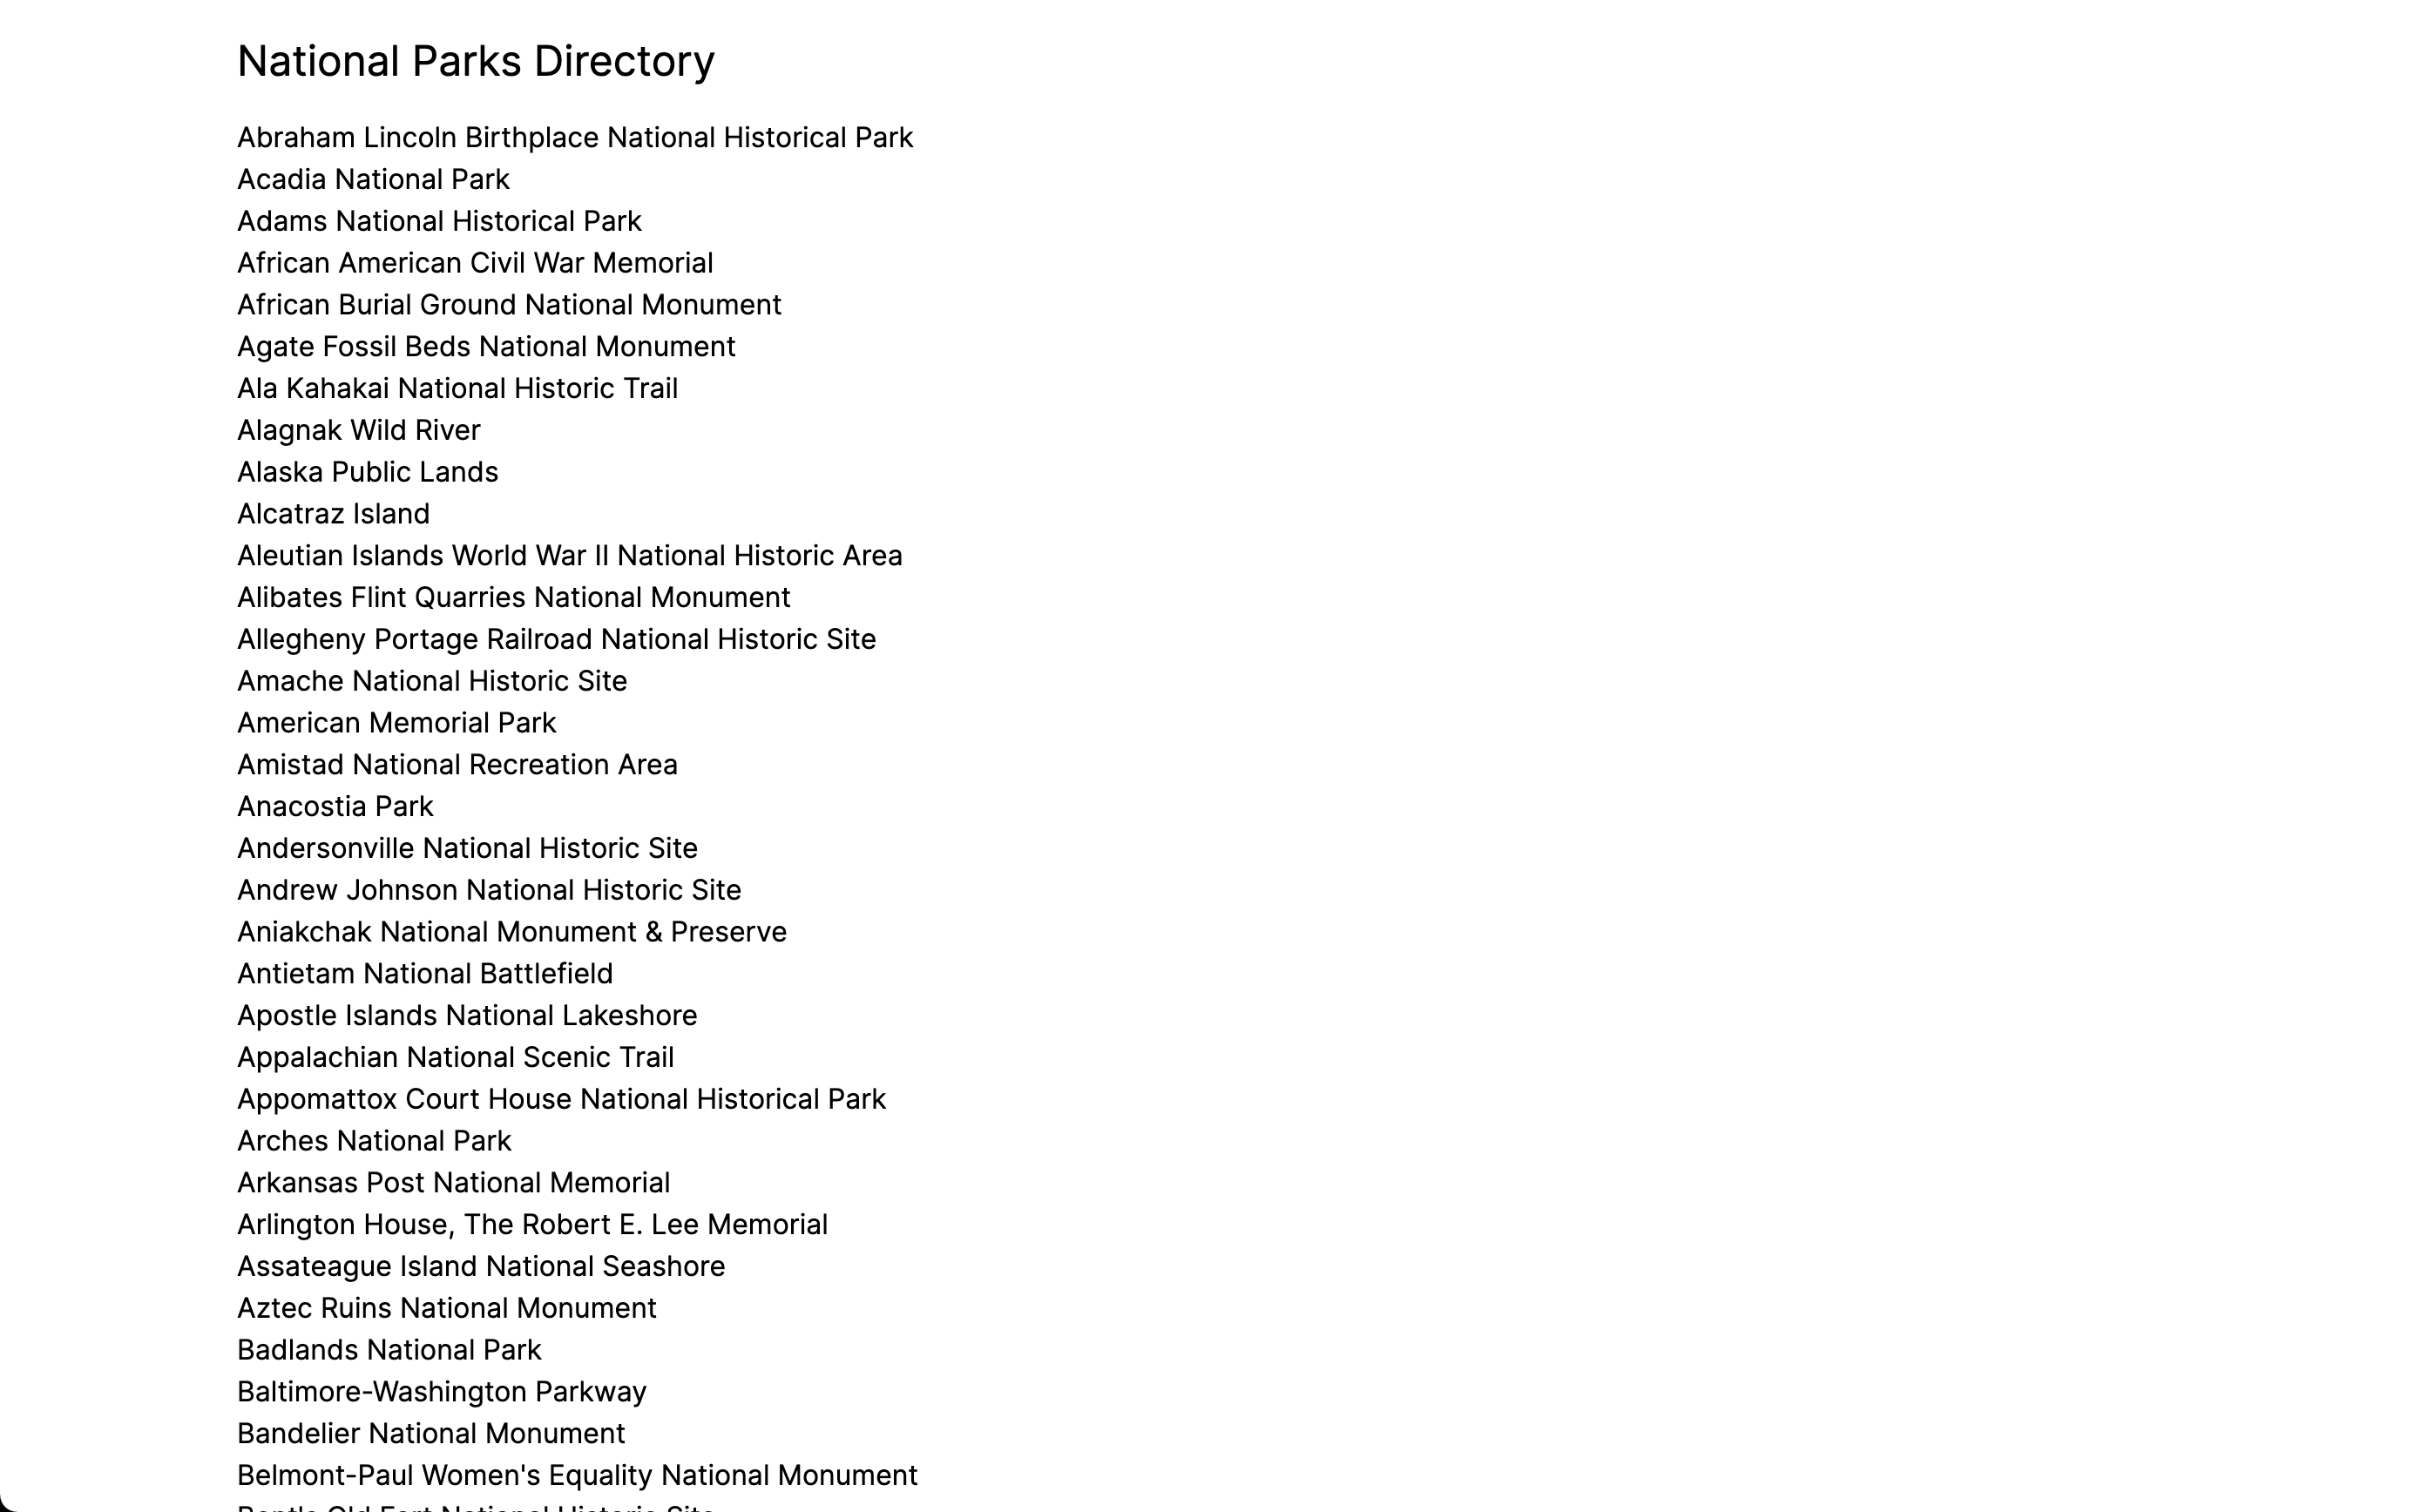
Nothing fancy, here. We’re just looping through the list of parks and rendering the name as a link. When the user clicks a link, they get taken to the “show” page for that park:
<div class="grid grid-cols-1 gap-2">
<div>
<h1 class="text-xl font-bold"><%= @park.name %></h1>
</div>
<div>
<p><%= @park.description %></p>
</div>
<div class="grid grid-cols-3 gap-2">
<% @park.images.each do |image| %>
<div>
<img class="rounded w-full aspect-square" src="<%= image.url %>" />
</div>
<% end %>
</div>
 Step 2: Turbo’ing the App
All we’ve seen so far is standard Rails fare. Now let’s spruce things up a bit. Here’s what we’re after:

This looks very similar to our original list of parks, except now we’ve added a details panel to the right that reflects the park we click on. How do we implement this?
I’ll first show you what changes we need to make to the index.html.erb page, then I’ll explain what’s going on:
<div class="grid gap-4">
<div>
<h1 class="text-2xl">National Parks Directory</h1>
</div>
<div class="grid grid-cols-3 gap-4">
<div>
<ul>
<% @parks.each do |park| %>
<li><%= link_to park.name, park_path(park.id), data: { turbo_frame: 'park_details' } %></li>
<% end %>
</ul>
</div>
<div class="col-span-2">
<%= turbo_frame_tag "park_details" do %>
Click on a park for more details
<% end %>
</div>
</div>
</div>
There are two changes of note here. The first is the code for the details panel on the right:
<div class="col-span-2">
<%= turbo_frame_tag "park_details" do %>
Click on a park for more details
<% end %>
</div>
You’ll notice we added a special new rails tag, “turbo_frame_tag.” We’re basically using this tag to tell Rails, “everything inside of this container gets loaded remotely.” The key we specify, “park_details,” is useful because we might have multiple areas of the page that should be loaded remotely, and we don’t want to update the wrong one. In fact, if you view the source of the page that this renders, you’ll see this:
<turbo-frame id="park_details">
Click on a park for more details
</turbo-frame>
Rails is using our key as a regular old DOM id that can be replaced by the turbo JS library.
The “Click on a park for more details” part inside the block is the default content that loads in the frame before any remote replacements happen.
Once we’ve defined a target, how do we inject new content into it? Here’s the really cool part: we don’t have to touch any Javascript files to do this! We can just use a normal link to the show page with one minor tweak:
<%= link_to park.name, park_path(park.id), data: { turbo_frame: 'park_details' } %>
You’ll notice we added this “turbo_frame” data attribute to the link. That “park_details” value should look familiar because it matches the id of the turbo_frame_tag we generated above. Rails sees this link and says, “Hey, I noticed you clicked on a link that specifies a turbo_frame. Let me remotely download the response from that request then dump it into the turbo_frame you specified.”
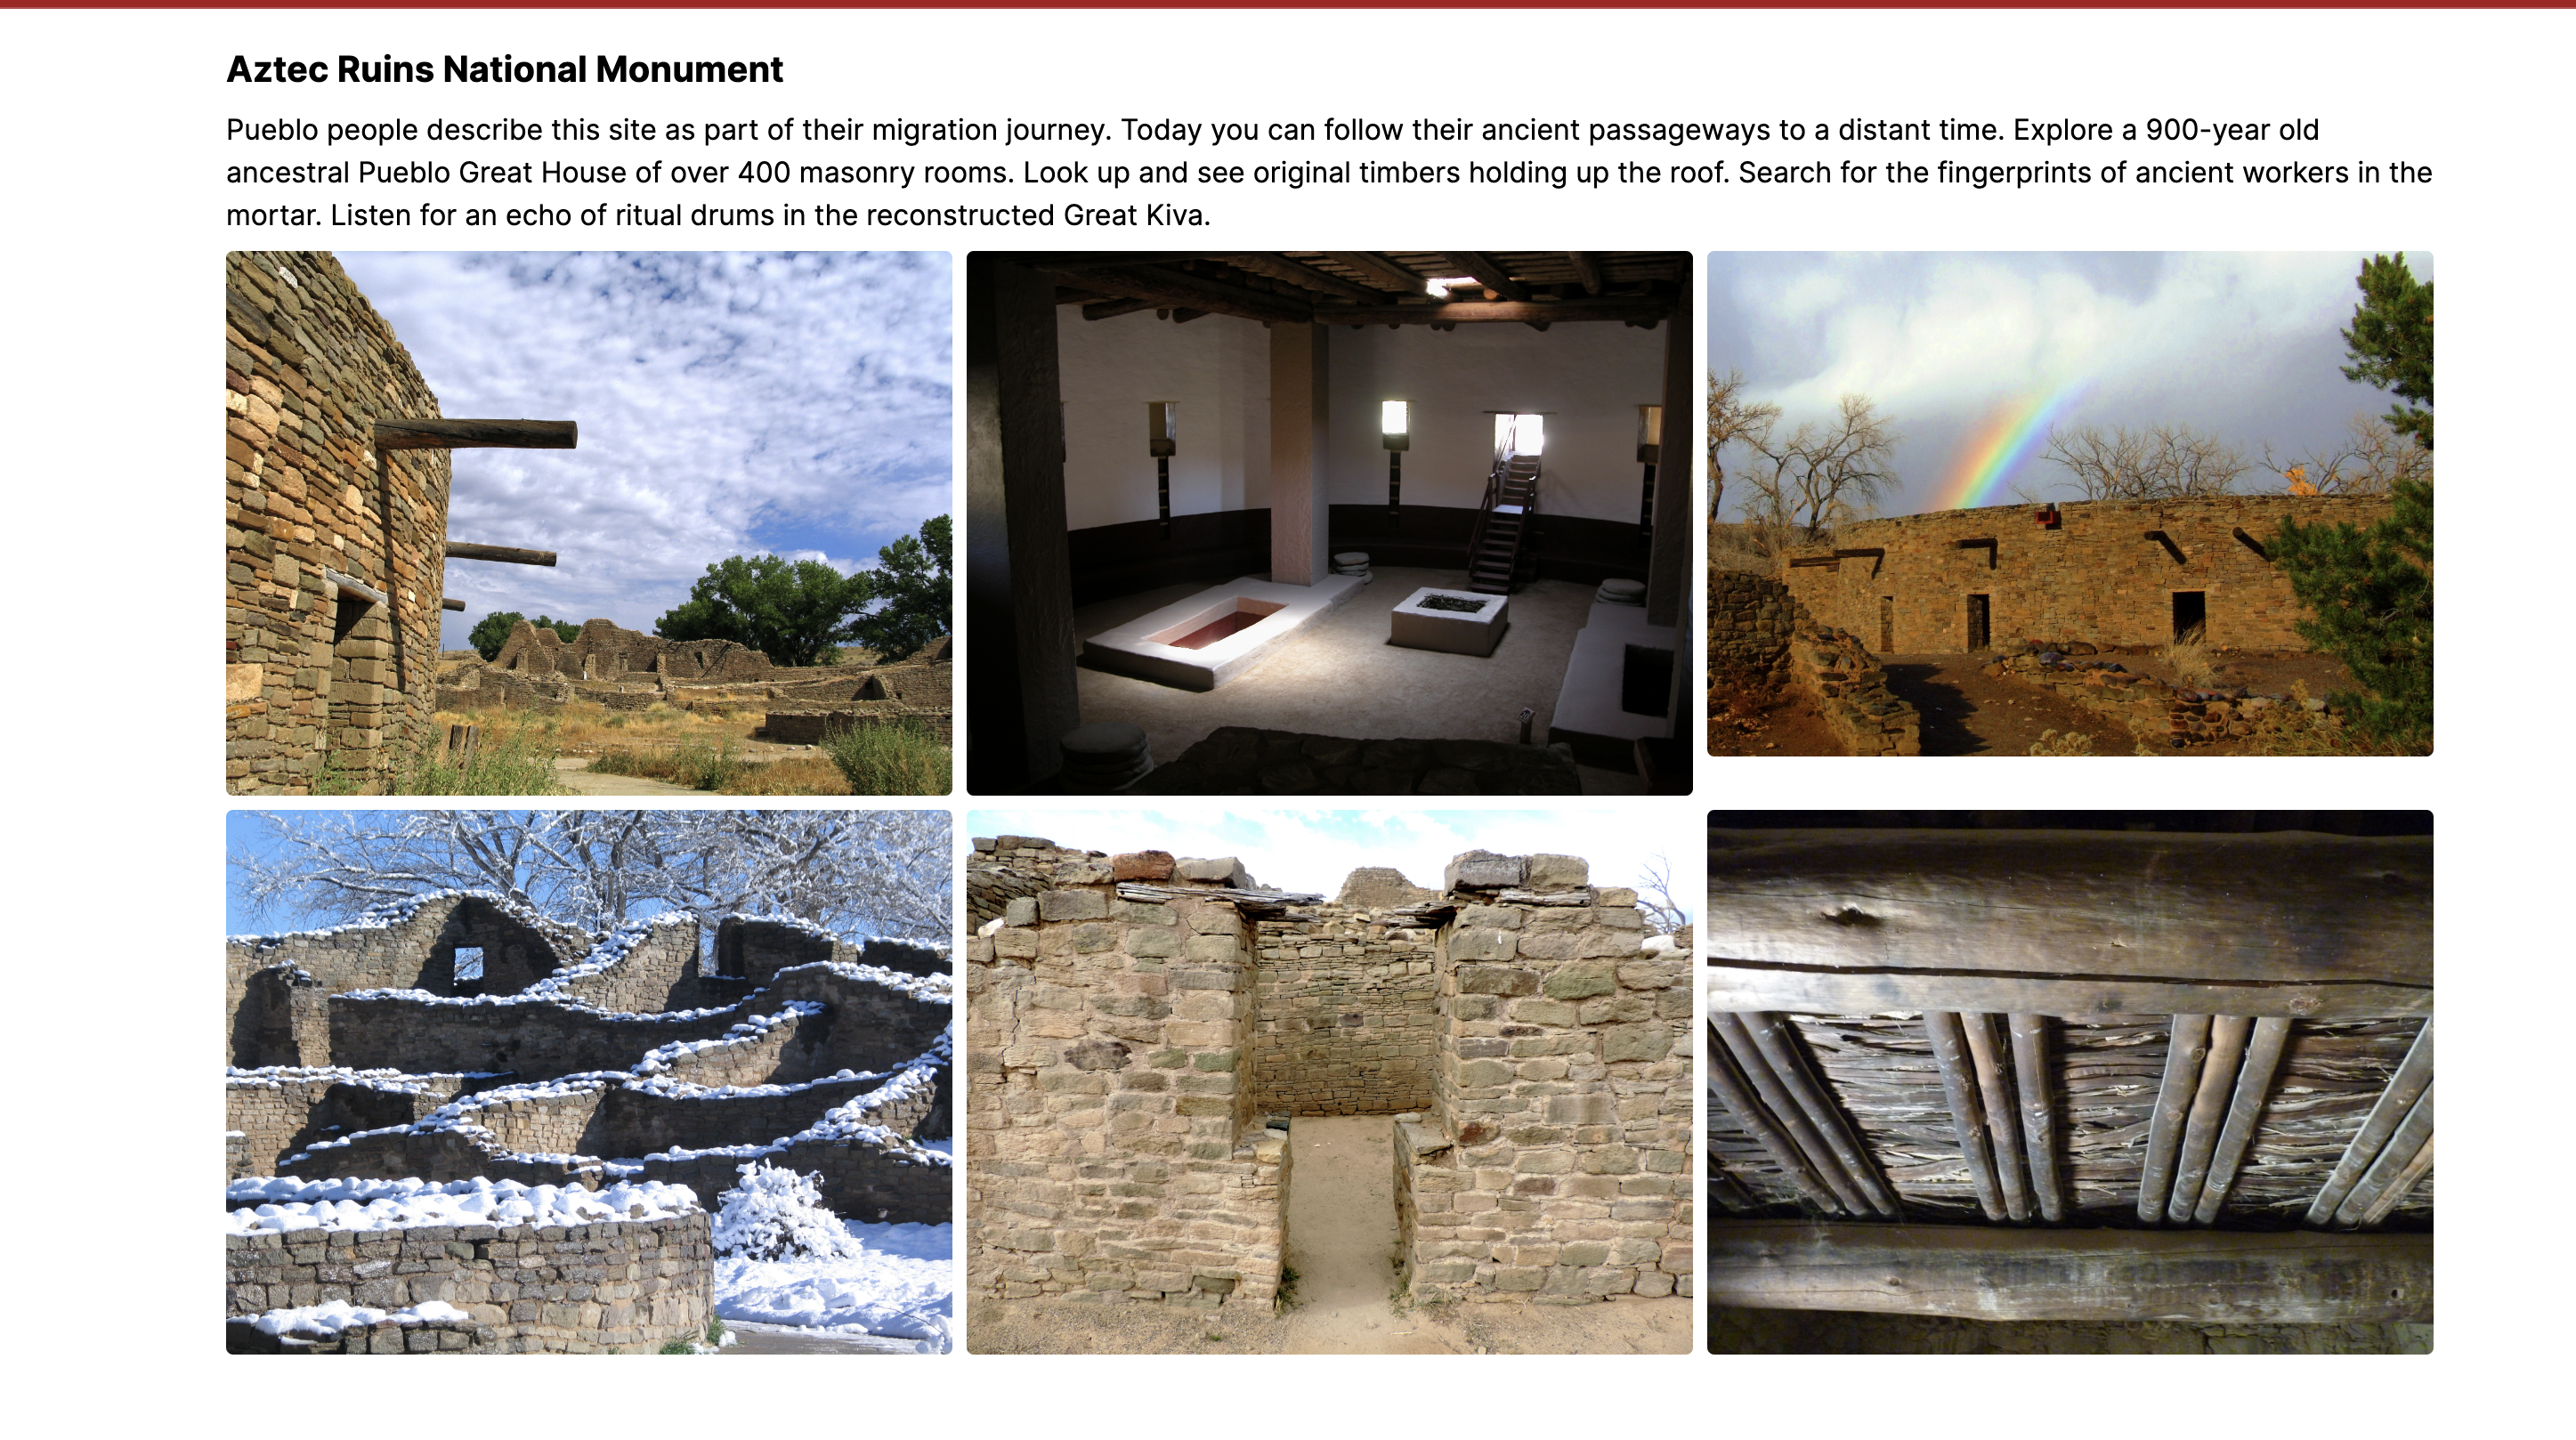
But here’s the problem: the call to the show route returns a full-blown HTML response. We don’t want to render the entire show.html.erb page inside our turbo-frame! We only want the equivalent of a Rails partial to show up. Let’s look at the updated show.html.erb page to see how to do that:
<%= turbo_frame_tag "park_details" do %>
<div class="grid grid-cols-1 gap-2">
<div>
<h1 class="text-xl font-bold"><%= @park.name %></h1>
</div>
<div>
<p><%= @park.description %></p>
</div>
<div class="grid grid-cols-3 gap-2">
<% @park.images.each do |image| %>
<div>
<img class="rounded w-full aspect-square" src="<%= image.url %>" />
</div>
<% end %>
</div>
</div>
If you’ll notice, other than some styling changes, this doesn’t look terribly different than our normal server-side rendered show.html.erb response. However, there’s one key difference:
<%= turbo_frame_tag "park_details" do %>
Hey, we’ve seen this tag before! This is the same tag that was in our index.html.erb page, but with different contents. Here’s an example of what will be rendered using the show page:
<turbo-frame id="park_details" reloadable="" src="http://localhost:3000/parks/77E0D7F0-1942-494A-ACE2-9004D2BDC59E">
<div class="grid grid-cols-1 gap-2">
<div>
<h1 class="text-xl font-bold">Abraham Lincoln Birthplace National Historical Park</h1>
</div>
<div>
<p>For over a century people from around the world have come to rural Central Kentucky to honor the humble beginnings of our 16th president, Abraham Lincoln. His early life on Kentucky's frontier shaped his character and prepared him to lead the nation through Civil War. The country's first memorial to Lincoln, built with donations from young and old, enshrines the symbolic birthplace cabin.</p>
</div>
<div class="grid grid-cols-3 gap-2">
<div>
<img class="rounded w-full aspect-square" src="https://www.nps.gov/common/uploads/structured_data/3C861078-1DD8-B71B-0B774A242EF6A706.jpg">
</div>
<div>
<img class="rounded w-full aspect-square" src="https://www.nps.gov/common/uploads/structured_data/3C861263-1DD8-B71B-0B71EF9B95F9644F.jpg">
</div>
<div>
<img class="rounded w-full aspect-square" src="https://www.nps.gov/common/uploads/structured_data/3C86137D-1DD8-B71B-0B978BACD7EBAEF1.jpg">
</div>
<div>
<img class="rounded w-full aspect-square" src="https://www.nps.gov/common/uploads/structured_data/3C8614D1-1DD8-B71B-0B1AF72CA452B051.jpg">
</div>
</div>
</div>
</turbo-frame>
Going back to our link that we clicked, you’ll recall that we passed in this data attribute:
data: { turbo_frame: 'park_details' }
When the link gets clicked, turbo intercepts the click event, downloads the link’s response using AJAX, then replaces the index page’s <turbo-frame> contents with the matching frame from the show page. The pairing is all done via the key (in our case, “park_details.”) Here’s what the response looks like:
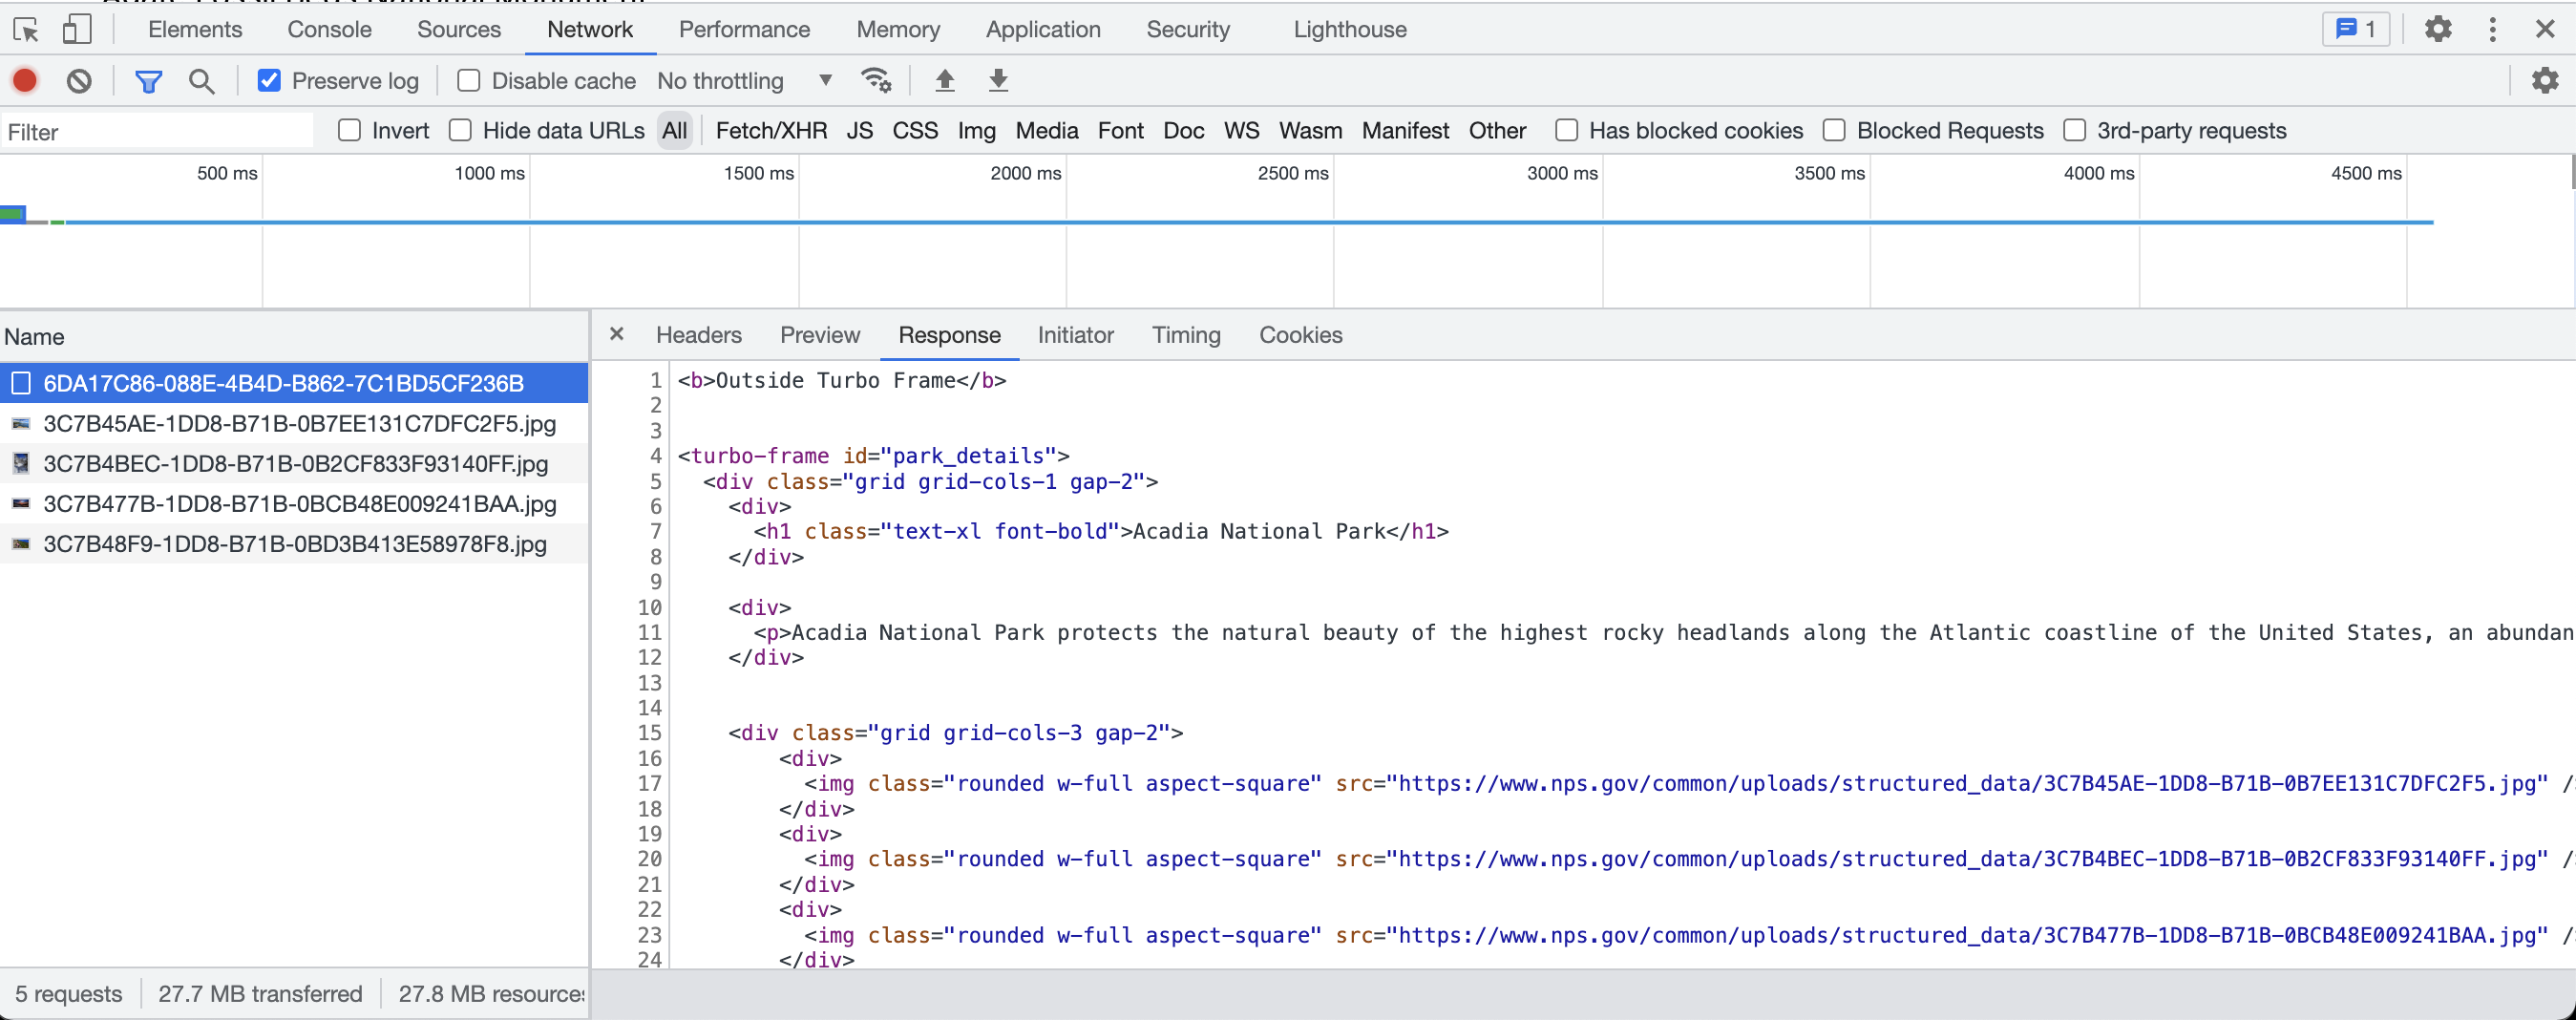
As you can see, we’re still rendering the full HTML form from show.html.erb, but turbo is smart enough to extract the “park_details” turbo-frame and inject its contents into the targeted container on the index.html.erb page. A nice side effect of this approach is that the full server-side version of the page can still be accessed via our normal /parks/<id> show route:
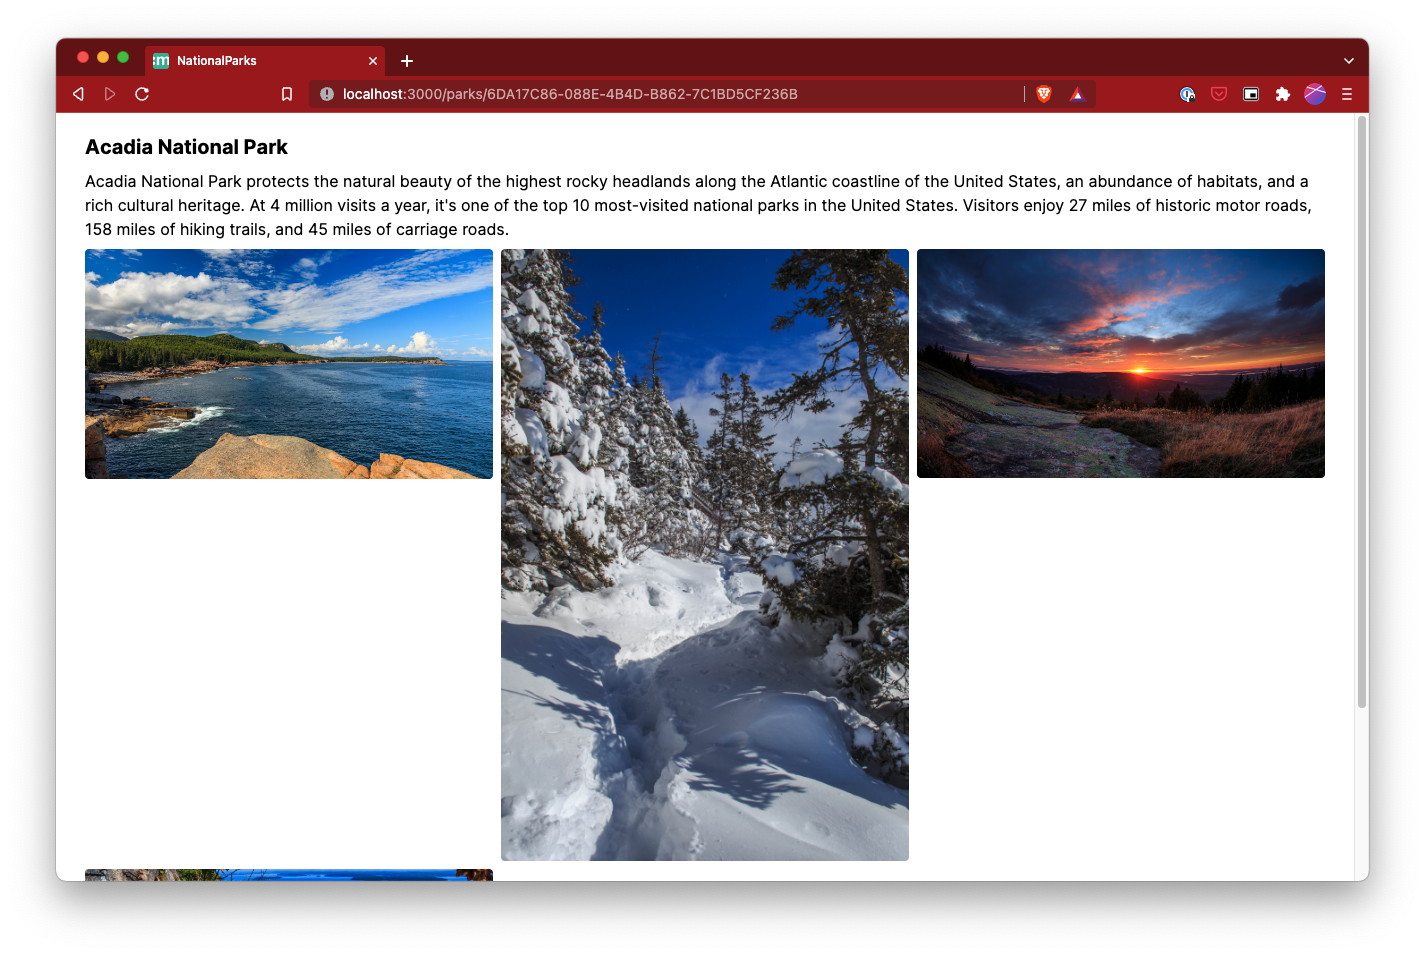 If we visit the show route directly in our browser, the page loads as it did before we added the turbo_frame_tag. However, if Turbo Frames requests the page, it will render only the partial content inside the turbo_frame_tag.
Conclusion:
That’s the basics of Turbo Frames. We didn’t go into eager/lazy loading, forms, nor did we touch the even more powerful Turbo Streams. But honestly, even if you don’t take the time to learn those, you already have a pretty simple yet powerful way to update content remotely without writing repetitive Javascript or dragging a SPA framework unnecessarily into your app. That’s a win in my book! Happy, productive coding!
Sources:
- National Parks API - https://www.nps.gov/subjects/developer/api-documentation.htm#/
- Decompose with Turbo Frames - https://turbo.hotwired.dev/handbook/frames
- Turbo Rails Github - https://github.com/hotwired/turbo-rails
- Turbo Frames vs Turbo Streams - https://www.youtube.com/watch?v=vnDWsGtzOCc


